Sunday, May 10, 2015

BeagleBone Black Development Part 5 - Installing Linux to eMMC using Micro SD

This is the fifth tutorial in a series for BeagleBone Black Development.    Earlier posts cover setup and installation of Debian Jessie for cross-development (in Part 1, Part 2, and Part 3) and BeagleBone Black kernel build steps in Part 4.  Part 6 show how to remotely debug an application running on the BeagleBone Black using eclipse and gdb.

This tutorial uses the methods and file links from https://eewiki.net/display/linuxonarm/BeagleBone+Black for a mainline kernel build.

5 Installing Linux to eMMC using MicroSD


Login as root to work with the disk commands.  Enter the root password with the su command (rather than the user password that you use with the sudo command).
user@debian:~$ su -
Password:
root@debian:~#


5.1 Micro SD card partition setup and formatting


Use the lsblk command to see the name of your disk.
root@debian:~# lsblk
NAME   MAJ:MIN RM   SIZE RO TYPE MOUNTPOINT
sda      8:0    0    20G  0 disk
├─sda1   8:1    0  19.1G  0 part /
├─sda2   8:2    0     1K  0 part
└─sda5   8:5    0   880M  0 part [SWAP]
sr0     11:0    1  55.4M  0 rom  
sdb      8:16   1   3.7G  0 disk
└─sdb1   8:17   1   3.7G  0 part


The above listing shows a 4GB drive has a partition at /dev/sdb1 on disk /dev/sdb.  We know that it is the microSD because of the size.   We will put the disk into a shell variable for the disk commands.  Make sure you get the correct name (it shouldn’t be sda or sr0).  Replace null in the next command with your disk name.
root@debian:~# export DISK=/dev/null


We will also put the user’s bbb work directory into a variable.
root@debian:~# export BBB=/home/user/bbb


Erase the micro SD card.
root@debian:~# dd if=/dev/zero of=$DISK bs=1M count=10


Install the bootloader.
root@debian:~# dd if=$BBB/u-boot/MLO of=$DISK count=1 seek=1 bs=128k


root@debian:~# dd if=$BBB/u-boot/u-boot.img of=$DISK count=2 seek=1 bs=384k


Create the Linux Partition.
This command is dependent on the version of sfdisk installed on your host. For more information on this step it is worth visiting the eewiki page.  

Blogger isn't rendering the html correctly for the sfdisk command for me at the moment so here is an image for now.


Format the Linux partition.
root@debian:~# mkfs.ext4 ${DISK}1 -L rootfs


Create a mount point to access the drive and mount the partition.
root@debian:~# mkdir -p /media/rootfs
root@debian:~# mount ${DISK}1 /media/rootfs


Copy the root filesystem.  This takes a few minutes.
root@debian:~# tar xfvp $BBB/rootfs/*-*-*-armhf-*/armhf-rootfs-*.tar -C /media/rootfs


Backup the bootloader.
root@debian:~# mkdir -p /media/rootfs/opt/backup/uboot
root@debian:~# cp -v $BBB/u-boot/MLO /media/rootfs/opt/backup/uboot
root@debian:~# cp -v $BBB/u-boot/u-boot.img /media/rootfs/opt/backup/uboot


Export the kernel version from the kernel build if you haven’t already.
root@debian:~# source $BBB/bb-kernel/kernel_version


Set kernel version in uEnv.txt
root@debian:~# echo “uname_r=$kernel_version” >> /media/rootfs/boot/uEnv.txt


Copy the kernel image file.
root@debian:~# cp -v $BBB/bb-kernel/deploy/${kernel_version}.zImage
/media/rootfs/boot/vmlinuz-${kernel_version}


Copy the kernel device tree binaries.
root@debian:~# mkdir -p /media/rootfs/boot/dtbs/$kernel_version/
root@debian:~# tar xfv $BBB/bb-kernel/deploy/${kernel_version}-dtbs.tar.gz -C
/media/rootfs/boot/dtbs/$kernel_version


Copy the kernel modules.
root@debian:~# tar xfv $BBB/bb-kernel/deploy/${kernel_version}-modules.tar.gz -C
/media/rootfs


Set up the file systems table.
root@debian:~# echo '/dev/mmcblk0p1  /  auto  errors=remount-ro  0  1' >> /media/rootfs/etc/fstab


Set up networking.
root@debian:~# echo -e “\\nauto lo\\niface lo inet loopback” >>
/media/rootfs/etc/network/interfaces
root@debian:~# echo -e “\\nauto eth0\\niface eth0 inet dhcp” >>
/media/rootfs/etc/network/interfaces


root@debian:~# sync


It’s still mounted, unmount before ejecting
root@debian:/home/user/bbb/rootfs$ umount ${DISK}?


5.2 Copying the micro SD Linux OS to eMMC


Now we can remove the microSD and insert the card in the Beaglebone.  


Before you power the up the board Connect the FTDI USB to serial cable and use a terminal program like minicom (Linux) or teraterm (Windows).
Log into the serial console to run the script that copies the files from the SD to the eMMC.


This next step assumes you already have a debian system running on the eMMC and you are updating to your latest development build.  If you don’t have the eMMC set up this way the easiest thing to do is to download the latest debian micro SD image and flash that onto the board first.


Run the flasher on the beaglebone black in the serial terminal program. This script takes a few minutes to complete.
debian@arm:~$ sudo /bin/bash /opt/scripts/tools/eMMC/bbb-eMMC-flasher-eewiki-ext4.sh


If that script is not found you can download the latest flasher from eewiki.net and run it.
debian@arm:~$ wget https://raw.githubusercontent.com/RobertCNelson/boot-scripts/master/tools/eMMC/bbb-eMMC-flasher-eewiki-ext4.sh
debian@arm:~$ chmod +x bbb-eMMC-flasher-eewiki-ext4.sh
debian@arm:~$ sudo /bin/bash bbb-eMMC-flasher-eewiki-ext4.sh


When it's done you will see a row of 4 blue LEDs on the board that are all lit.


Power off the board, remove the micro SD and power on the board.  In the boot output you should see the date on u-boot and version of the kernel match the versions you compiled and copied to the board.  It should output boot information and come up to the login prompt in a minute.

Thursday, May 7, 2015

Beaglebone Black Development Part 4 - Bootloader, Linux Kernel and Filesystem

This is the fourth in a series of embedded Linux development tutorials.  This covers Beaglebone Black and shows steps to build the bootloader, Linux kernel and prepare a Debian 8 (Jessie) filesystem.   The commands and scripts are from
BeagleBone Black - Linux on ARM - eewiki.  That site is updated often so check there for the latest versions of the tools and sources.

To use these instructions you need to set up your Linux system as shown in  Debian Jessie Host Setup for Embedded Linux Development Part 3 - BeagleBone Black.  This tutorial continues in Beaglebone Black Development Part 5 - Installing Linux to eMMC using Micro SD.

4 Building the Bootloader, Linux Kernel and Filesystem

4.1 Building U-Boot


Download the source to u-boot with git. The git clone command takes about 10 minutes to complete.

user@debian:~$ cd ~/bbb

user@debian:~/bbb$ git clone git://git.denx.de/u-boot.git

user@debian:~/bbb$ cd u-boot/

user@debian:~/bbb/u-boot$ git checkout v2015.04 -b tmp
Apply patches to u-boot  for from TI.

user@debian:~/bbb/u-boot$ wget -c https://rcn-ee.com/repos/git/u-boot-patches/v2015.04/0001-am335x_evm-uEnv.txt-bootz-n-fixes.patch
user@debian:~/bbb/u-boot$ patch -p1 < 0001-am335x_evm-uEnv.txt-bootz-n-fixes.patch

The output of the patch command should have no errors.

patching file configs/am335x_evm_defconfig
patching file include/configs/am335x_evm.h

Now we can configure and build u-boot.
user@debian:~/bbb/u-boot$ source ~/am335x/armcc-vars

user@debian:~/bbb/u-boot$ make distclean
user@debian:~/bbb/u-boot$ make am335x_evm_defconfig

Now you can build the entire u-boot image with the make command.
user@debian:~/bbb/u-boot$ make

This will take a minute or two and you will see many object files being created (CC) and linked (LD); if the build was successful the last few lines look like this:
 CC      spl/drivers/watchdog/omap_wdt.o
 LD      spl/drivers/watchdog/built-in.o
 LD      spl/u-boot-spl
 OBJCOPY spl/u-boot-spl.bin
 MKIMAGE MLO

4.2 Upgrade the device tree compiler package


The dtc upgrade is maintained by Robert Nelson. The upgrade script will install a few additional development tools it needs, then builds and installs dtc.

user@debian:~$ cd ~/am335x/
user@debian:~/am335x$ wget -c https://raw.github.com/RobertCNelson/tools/master/pkgs/dtc.sh
user@debian:~/am335x$ chmod +x dtc.sh
user@debian:~/am335x$ ./dtc.sh

It should end with a successful install into /usr/local/bin/.
...
CC libfdt/fdt_empty_tree.o
AR libfdt/libfdt.a
LD fdtget
CC fdtput.o
LD fdtput
LD libfdt/libfdt-1.4.0.so
Installing into: /usr/local/bin/
CHK version_gen.h
INSTALL

If you get a timeout error try the command again.


4.3 Linux Kernel Build


4.3.1 Initial build


Warning: The initial build process can take an hour or more to complete.

Set up the kernel build scripts from Robert Nelson.
user@debian:~/bbb$ cd ~/bbb
user@debian:~/bbb$ git clone https://github.com/RobertCNelson/bb-kernel

Download the mainline 3.8 kernel into the workspace.
user@debian:~/bbb$ cd bb-kernel/
user@debian:~/bbb/bb-kernel$ git checkout origin/am33x-v3.8 -b tmp

First, set the toolchain variables if you haven’t already.
user@debian:~/bbb/bb-kernel$ source ~/am335x/armcc-vars

Perform the build using Robert Nelson’s script.  This step can take hours to run.
user@debian:~/bbb/bb-kernel$ ./build_kernel.sh


After a long while it will pause at a menu screen.
linuxconf-yes.png
Tab over to highlight exit then press enter and it will continue to build the kernel.  This takes another hour.  

Here is an example of what you see when it’s finished:

`/home/user/bbb/bb-kernel/deploy/tmp/omap4-panda-es.dtb'
`./arch/arm/boot/dts/am335x-evmsk.dtb' -> `/home/user/bbb/bb-kernel/deploy/tmp/am335x-evmsk.dtb'
Compressing 3.8.13-bone70.5-dtbs.tar.gz...
-rw-r--r-- 1 user user 37K Mar 11 15:03 /home/user/bbb/bb-kernel/deploy/3.8.13-bone70.5-dtbs.tar.gz
-----------------------------
Script Complete
eewiki.net: [user@localhost:~$ export kernel_version=3.8.13-bone70.5]
-----------------------------

Save the export command in a file so you can easily set the the kernel_version variable.
user@debian:~/bbb/bb-kernel$ echo ‘export kernel_version=3.8.13-bone70.5’ > kernel_version

You can execute the export command by sourcing the file.
user@debian:~/bbb/bb-kernel$ source kernel_version

4.3.2 Rebuilding the Kernel


If you do not need to get the latest kernel source from the internet you can build the source on disk by using the rebuild script.  This only takes a few minutes.

user@debian:~/bbb/bb-kernel$ source ~/am335x/armcc-vars
user@debian:~/bbb/bb-kernel$ ./tools/rebuild.sh

4.4 Preparing a Root Filesystem


4.4.1 Download a pre-built Debian 8 root filesystem.


user@debian:~$ cd ~/bbb
user@debian:~/bbb$ mkdir rootfs
user@debian:~/bbb$ cd rootfs
user@debian:~/bbb/rootfs$ wget -c https://rcn-ee.com/rootfs/eewiki/minfs/debian-8.0-minimal-armhf-2015-04-27.tar.xz

Verify the image is correct.
user@debian:~/bbb/rootfs$ md5sum debian-8.0-minimal-armhf-2015-04-27.tar.xz

The md5sum command output should match this:
384b8681a5550eb139ad6e368aabd142  debian-8.0-minimal-armhf-2015-04-27.tar.xz

Uncompress the archive file.
user@debian:~/bbb/rootfs$ tar xf debian-8.0-minimal-armhf-2015-04-27.tar.xz

Debian Jessie Host Setup for Embedded Linux Development Part 3 - BeagleBone Black

This is the third in a series of tutorials to set up a Debian Jessie host for BeagleBone Black development.  It uses scripts and instructions from eewiki.net.  Part 1 and Part 2 cover Debian host cross development setup for most any Linux target.  Part 4 continues with building the u-boot, the Linux kernel and preparing a Debian Jessie root filesystem for the BeagleBone Black.  Part 5 goes through the steps to create a micro SD image from your builds to and copying it to eMMC. Part 6 shows how to set up remote debugging in eclipse using gdb for an application.

3 Debian Host Cross-Compiler Setup


This section is based on the website Linux on ARM at eewiki.net, hosted by DigiKey and maintained by Digi-Key Application Engineer Robert Nelson.  https://eewiki.net/display/linuxonarm/BeagleBone+Black
Another good reference for working with the Beaglebone Black is
It covers building Debian kernels for BeagleBone Black and includes links to the latest images.

3.1 Create Tool and Source directories


Make sure you aren’t logged in as root for this section.


Create a directory to store the development tools in the user home directory.
user@debian:~$ mkdir ~/am335x


Create a user work directory for the board you are working on to store source files.
user@debian:~$ mkdir ~/bbb


3.2 Install ARM Cross-Compiler GCC


The commands below will download, uncompress and set up the GCC cross-compiler for ARM.


user@debian:~$ cd ~/am335x
user@debian:~/am355x$ wget -c https://releases.linaro.org/14.09/components/toolchain/binaries/gcc-linaro-arm-linux-gnueabihf-4.9-2014.09_linux.tar.xz


user@debian:~/am335x$ tar xf gcc-linaro-arm-linux-gnueabihf-4.9-2014.09_linux.tar.xz


user@debian:~/am335x$ echo export CC=`pwd`/gcc-linaro-arm-linux-gnueabihf-4.9-2014.09_linux/bin/arm-linux-gnueabihf- > armcc-vars


This created a file we can source to set up the environment for building with the toolchain.
user@debian:~/am335x$ source ~/am335x/armcc-vars


At this step we are using a pre-built 32-bit version of Linaro gcc so some 32-bit libraries must be installed.
user@debian:~/am335x$ sudo dpkg --add-architecture i386
user@debian:~/am335x$ sudo apt-get update
user@debian:~/am335x$ sudo apt-get install libc6:i386 libstdc++6:i386 libncurses5:i386 zlib1g:i386


Now the CC variable is set and we can run a simple test of the compiler installation.


user@debian:~/am335x$ ${CC}gcc --version
arm-linux-gnueabihf-gcc (crosstool-NG linaro-1.13.1-4.9-2014.09 - Linaro GCC 4.9-2014.09) 4.9.2 20140904 (prerelease)
Copyright (C) 2014 Free Software Foundation, Inc.
This is free software; see the source for copying conditions.  There is NO
warranty; not even for MERCHANTABILITY or FITNESS FOR A PARTICULAR PURPOSE.


A few other variables need to be set for building u-boot and the Linux kernel; they can be added to the armcc-vars file as well.


user@debian:~/am335x$ echo 'export ARCH=arm' >> armcc-vars
user@debian:~/am335x$ echo 'export CROSS_COMPILE=${CC}' >> armcc-vars


Update the environment.  
user@debian:~/am335x$ source ~/am335x/armcc-vars
When you close the terminal emulator, the variables settings will not be retained.  If you open a new terminal you need to source this file again before building code.

Update the linux packages that are installed and add a few more that are needed to build the Linux kernel.


If you are logged in as root:
root@debian# apt-get install bc device-tree-compiler lsb-release lzma lzop u-boot-tools libncurses5-dev


If you installed sudo and you are logged in as a user:

user@debian:~$ sudo apt-get install bc device-tree-compiler lsb-release lzma lzop u-boot-tools libncurses5-dev

Debian Jessie Host Setup for Embedded Linux Development Part 2

This is a continuation of Debian Jessie Host Setup for Embedded Linux Development Part 1, it covers installation of some additional host software necessary for linux cross development.   Part 1 covers only a minimal install.  This post is applies to a generic embedded Linux development system.

If you are targeting the Beaglebone Black, there are a few additional tutorial posts.  Part 3 covers Debian Host Cross-Compiler Setup.  Part 4 continues with building the u-boot bootloader, the Linux kernel and preparing a Debian Jessie root filesystem for the BeagleBone Black.  Part 5 goes through the steps to create a micro SD image from your builds to and copying it to eMMC.  Part 6 shows how to set up remote debugging in eclipse using gdb for an application.

2 Debian Host Software Setup


2.1 Serial Port Setup for Linux Console Access


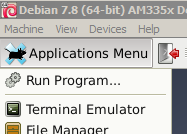
Log in to the user account and open a Terminal Emulator.


Use the su command in the terminal to login to the root account.  For the password prompt use the root password.
user@debian:~$ su -
Password:
root@debian#


Install the minicom program to access the serial port and the target console (with a USB to serial device).


root@debian# apt-get install minicom


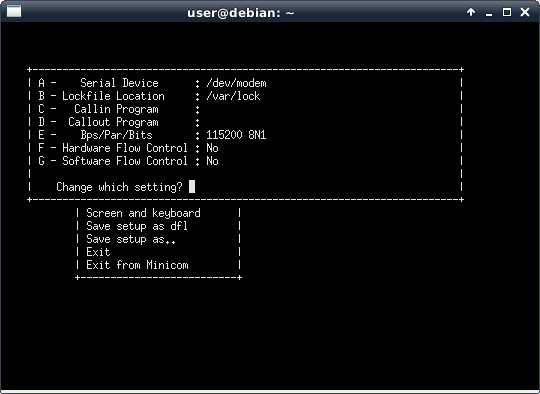
Minicom will have hardware flow control enabled by default, you will need to turn that off first thing.
root@debian# minicom --setup


41 configure minicom 1.png
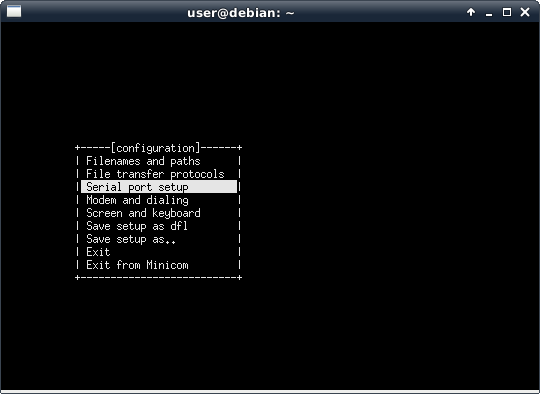
Use the arrow keys to Select Serial port setup and press ENTER.


41 configure minicom 2.png
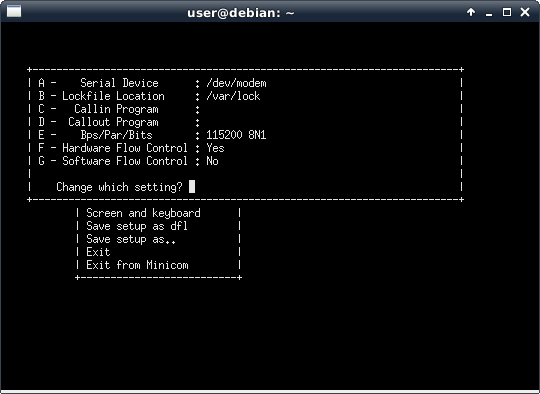
Toggle the flow control settings by pressing 'f' so they are both set to 'No'
41 configure minicom 3.png
Hit them ESC key to exit the menu.


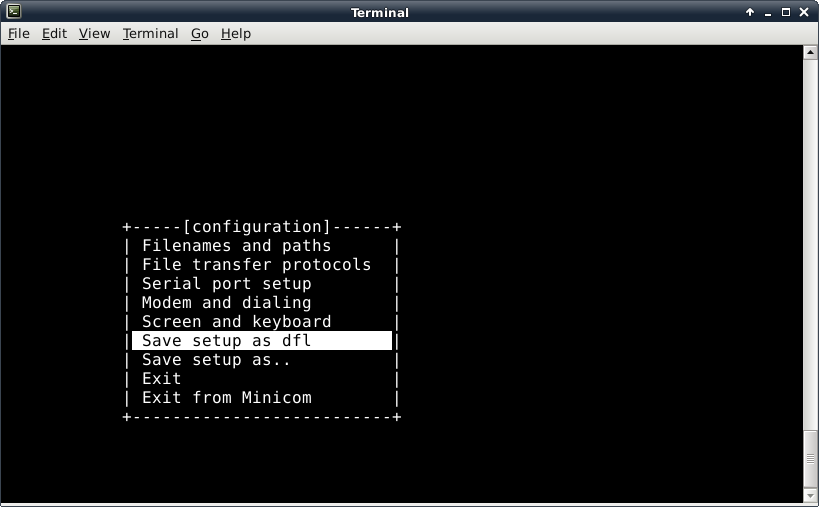
Use the arrow keys to select save the setup as default.
42 save setup as default.png
Press enter, then arrow down to ‘Exit from Minicom’ and press enter.  You can ignore the error message about /dev/modem if you see it.


A USB-to-serial device will be used to connect to the target.  For the BeagleBone Black use an FTDI cable, part number TTL-232R-3V3, available at digikey.com (Digi-Key part number 768-1015-ND) and a few other distributors. Adafruit also has a compatible USB-to-serial cable with transparent plastic so you can see the rx and tx LEDs.


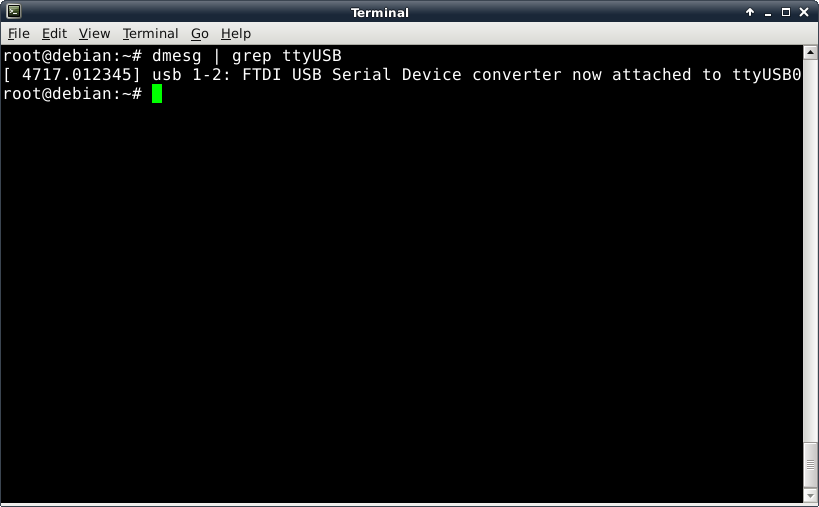
You need to see what path it was assigned.  You can do that with the dmesg command.


root@debian# dmesg | grep ttyUSB
45 dmesg grep tty.png


The command shows that it can be accessed at /dev/ttyUSB0.  Use this with minicom’s -D option.


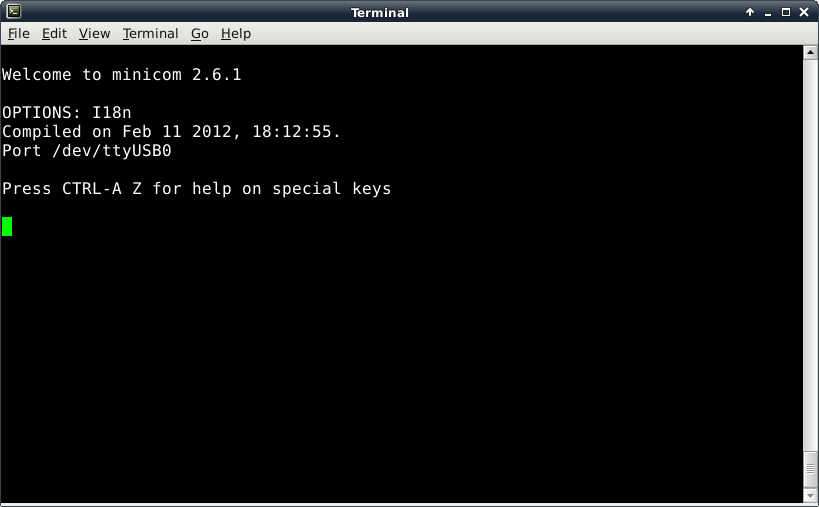
root@debian# minicom -D /dev/ttyUSB0


46 minicom welcome.png


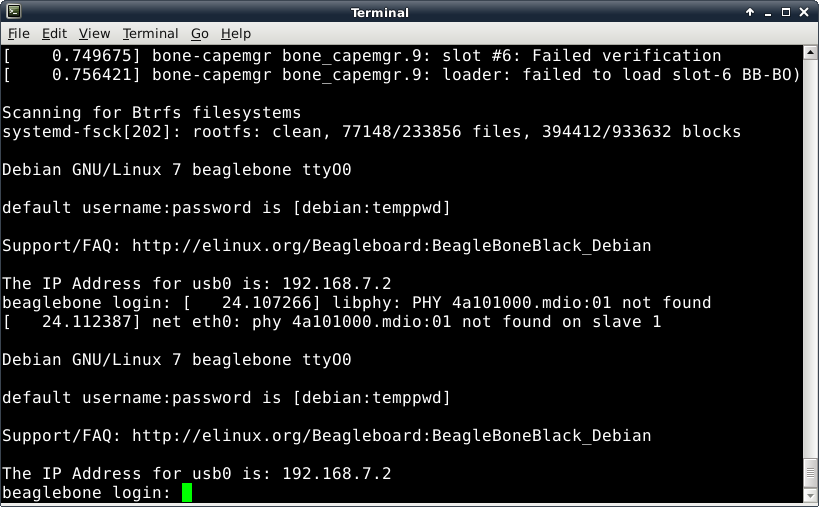
If you now connect a BeagleBone Black connected and power it up you will see boot messages and a login prompt.  If you don’t have one set up yet skip to the next section.
47 minicom BBB.png
Log in with the shown username password (debian and temppd).  Shutdown the Beaglebone with the following before  disconnecting power.
debian@beaglebone:~$ sudo shutdown -h now


To exit minicom type CONTROL-A then press Q, it will prompt to leave without reset, just hit ENTER for the default, .

2.2 Install Development Tools and Utilities


Install git to retrieve source files from the internet for the Linux Kernel and the bootloader.
root@debian# apt-get install git git-gui gitk


The sudo program is used by some scripts and eclipse for remote debug.  It performs commands as if you were logged in as root.
root@debian# apt-get install sudo


Replace the hightlighted word 'user' in the next command with your development username (not root).  For example, if you logged in as joe, the command will be 'adduser joe sudo'.
root@debian# adduser user sudo


The user that was added must log out completely and log in again for the adduser command to take effect.


To use sudo, just enter the user password when prompted (not root’s password).  You can test it by listing the /root directory.
user@debian:~$ ls /root
ls: cannot open directory /root: Permission denied
user@debian:~$ sudo ls /root
[sudo] password for user:
Desktop  Documents  Downloads  Music  Pictures  Public  Templates  Videos