Showing posts with label development board. Show all posts

Friday, January 30, 2026

Keyword Spotting on ESP32-C3-Lyra V2 Using ESP-IDF

ESP32-C3 Keyword Spotting (TFLite Micro micro_speech) with Onboard Mic (ADC)

ESP32-C3 Keyword Spotting (“Yes/No”) with TFLite Micro micro_speech using the Onboard Mic (ADC)

This post documents how to run TensorFlow Lite for Microcontrollers (TFLM) (now branded as LiteRT for Microcontrollers) keyword spotting example (micro_speech) on an ESP32-C3 board, and how to adapt the example to use the onboard analog microphone routed through the ESP32-C3 ADC. To set up the ESP32-C3-lyra V2, see this post: Hello World on ESP-32-C3-Lyra V2.0

Environment / Versions

  • Target board: ESP32-C3 (ESP32-C3-Lyra)
  • ESP-IDF version: v6.x (or v6.0-dev)
  • Example project: esp-tflite-micro:micro_speech (keyword spotting “yes/no”)
Note (ESP-IDF v6+): ESP-IDF v6 removed the legacy ADC header (driver/adc.h) and renamed some ADC attenuation enums. The ADC code below reflects those v6+ changes.

Command Log

1) Load the ESP-IDF environment

. $HOME/esp/esp-idf/export.sh

2) Create a new project from the micro_speech example

cd ~
idf.py create-project-from-example "espressif/esp-tflite-micro=1.3.0:micro_speech"
mv ~/micro_speech ~/keyword_spotting_tflm

3) Set the target to ESP32-C3

cd ~/keyword_spotting_tflm && idf.py set-target esp32c3

4) Install/verify ESP-IDF tools for ESP32-C3 (v6+ toolchain)

python3 $IDF_PATH/tools/idf_tools.py install --targets esp32c3
. $HOME/esp/esp-idf/export.sh

5) Build

cd ~/keyword_spotting_tflm && idf.py build

6) Flash and open the serial monitor

cd ~/keyword_spotting_tflm && idf.py -p /dev/ttyUSB0 flash monitor
Exit the monitor: Press Ctrl + ]

Troubleshooting

Issue: Default example tried I2S and failed

The upstream micro_speech project’s audio capture path attempted to configure I2S pins (I2S microphone). On this setup, we used the onboard mic through ADC instead. The following error occurs:

E (...) i2s_set_pin(...): bck_io_num invalid
E (...) TF_LITE_AUDIO_PROVIDER: Error in i2s_set_pin

Fix: Switch audio capture from I2S to ADC continuous sampling

Key points of the ADC implementation:

  • Use esp_adc/adc_continuous.h continuous mode to sample at 16 kHz.
  • Convert 12-bit unsigned ADC samples into signed 16-bit PCM-like samples centered around mid-scale.
  • Write samples into the existing ring buffer so the model’s GetAudioSamples() continues to work.

Replace audio_provider.cc with the working ADC version (ESP32-C3 TYPE2) by replacing the entire contents of:

~/keyword_spotting_tflm/main/audio_provider.cc

with the following code:

/* ADC-based audio provider for ESP32-C3-Lyra (MIC_ADC on IO0 / ADC1 CH0) */

#include "audio_provider.h"

#include <cstring>

#include "freertos/FreeRTOS.h"
#include "freertos/task.h"

#include "esp_log.h"

#include "esp_adc/adc_continuous.h"

#include "ringbuf.h"
#include "micro_model_settings.h"

static const char* TAG = "TF_LITE_AUDIO_PROVIDER";

ringbuf_t* g_audio_capture_buffer;
volatile int32_t g_latest_audio_timestamp = 0;

constexpr int32_t history_samples_to_keep =
    ((kFeatureDurationMs - kFeatureStrideMs) * (kAudioSampleFrequency / 1000));
constexpr int32_t new_samples_to_get =
    (kFeatureStrideMs * (kAudioSampleFrequency / 1000));

const int32_t kAudioCaptureBufferSize = 40000;

namespace {
int16_t g_audio_output_buffer[kMaxAudioSampleSize * 32];
bool g_is_audio_initialized = false;
int16_t g_history_buffer[history_samples_to_keep];

adc_continuous_handle_t g_adc_handle = NULL;

// Read buffer (raw ADC frames)
static constexpr size_t kAdcReadBytes = 1024;
uint8_t g_adc_read_buf[kAdcReadBytes];

// Temporary PCM buffer (int16)
int16_t g_pcm_buf[kAdcReadBytes / sizeof(adc_digi_output_data_t)];

// ESP32-C3-Lyra MIC_ADC is routed to IO0 => ADC1 channel 0
static constexpr adc_unit_t kAdcUnit = ADC_UNIT_1;
static constexpr adc_channel_t kAdcChannel = ADC_CHANNEL_0;
static constexpr adc_atten_t kAdcAtten = ADC_ATTEN_DB_12;
static constexpr adc_bitwidth_t kAdcBitwidth = ADC_BITWIDTH_12;
}  // namespace

static void adc_init_continuous() {
  adc_continuous_handle_cfg_t handle_cfg = {
      .max_store_buf_size = 4096,
      .conv_frame_size = 1024,
  };
  ESP_ERROR_CHECK(adc_continuous_new_handle(&handle_cfg, &g_adc_handle));

  adc_digi_pattern_config_t pattern = {};
  pattern.atten = kAdcAtten;
  pattern.channel = kAdcChannel;
  pattern.unit = kAdcUnit;
  pattern.bit_width = kAdcBitwidth;

  adc_continuous_config_t dig_cfg = {};
  dig_cfg.sample_freq_hz = kAudioSampleFrequency;  // 16 kHz
  dig_cfg.conv_mode = ADC_CONV_SINGLE_UNIT_1;

  // ESP32-C3 DMA output uses TYPE2 layout
  dig_cfg.format = ADC_DIGI_OUTPUT_FORMAT_TYPE2;

  dig_cfg.pattern_num = 1;
  dig_cfg.adc_pattern = &pattern;

  ESP_ERROR_CHECK(adc_continuous_config(g_adc_handle, &dig_cfg));
  ESP_ERROR_CHECK(adc_continuous_start(g_adc_handle));
}

static inline int16_t adc12_to_pcm16(uint16_t adc12) {
  int32_t centered = (int32_t)adc12 - 2048;
  int32_t pcm = centered << 4;  // scale 12-bit to ~16-bit
  if (pcm > 32767) pcm = 32767;
  if (pcm < -32768) pcm = -32768;
  return (int16_t)pcm;
}

static void CaptureSamples(void* arg) {
  adc_init_continuous();

  while (true) {
    uint32_t out_bytes = 0;
    esp_err_t ret = adc_continuous_read(
        g_adc_handle, g_adc_read_buf, kAdcReadBytes, &out_bytes, pdMS_TO_TICKS(200));

    if (ret == ESP_OK && out_bytes > 0) {
      const size_t n_frames = out_bytes / sizeof(adc_digi_output_data_t);

      for (size_t i = 0; i < n_frames; i++) {
        const adc_digi_output_data_t* p =
            (const adc_digi_output_data_t*)(g_adc_read_buf +
                                            i * sizeof(adc_digi_output_data_t));

        // ESP32-C3 uses type2 layout (type1 will not compile)
        uint16_t raw = (uint16_t)(p->type2.data);

        g_pcm_buf[i] = adc12_to_pcm16(raw);
      }

      const int bytes_to_write = (int)(n_frames * sizeof(int16_t));
      const int bytes_written = rb_write(g_audio_capture_buffer,
                                         (uint8_t*)g_pcm_buf,
                                         bytes_to_write,
                                         pdMS_TO_TICKS(200));

      if (bytes_written > 0) {
        const int samples_written = bytes_written / (int)sizeof(int16_t);
        g_latest_audio_timestamp += (1000 * samples_written) / kAudioSampleFrequency;
      }
    }

    if (ret != ESP_OK && ret != ESP_ERR_TIMEOUT) {
      ESP_LOGE(TAG, "adc_continuous_read failed: %s", esp_err_to_name(ret));
      vTaskDelay(pdMS_TO_TICKS(50));
    }
  }
}

TfLiteStatus InitAudioRecording() {
  g_audio_capture_buffer = rb_init("tf_ringbuffer", kAudioCaptureBufferSize);
  if (!g_audio_capture_buffer) {
    ESP_LOGE(TAG, "Error creating ring buffer");
    return kTfLiteError;
  }

  xTaskCreate(CaptureSamples, "CaptureSamples", 1024 * 4, NULL, 10, NULL);

  while (!g_latest_audio_timestamp) {
    vTaskDelay(1);
  }

  ESP_LOGI(TAG, "Audio Recording started (ADC continuous)");
  return kTfLiteOk;
}

TfLiteStatus GetAudioSamples1(int* audio_samples_size, int16_t** audio_samples) {
  if (!g_is_audio_initialized) {
    TfLiteStatus init_status = InitAudioRecording();
    if (init_status != kTfLiteOk) {
      return init_status;
    }
    g_is_audio_initialized = true;
  }

  int bytes_read =
      rb_read(g_audio_capture_buffer, (uint8_t*)(g_audio_output_buffer), 16000, 1000);
  if (bytes_read < 0) {
    ESP_LOGI(TAG, "Couldn't read data in time");
    bytes_read = 0;
  }
  *audio_samples_size = bytes_read;
  *audio_samples = g_audio_output_buffer;
  return kTfLiteOk;
}

TfLiteStatus GetAudioSamples(int start_ms, int duration_ms,
                             int* audio_samples_size, int16_t** audio_samples) {
  if (!g_is_audio_initialized) {
    TfLiteStatus init_status = InitAudioRecording();
    if (init_status != kTfLiteOk) {
      return init_status;
    }
    g_is_audio_initialized = true;
  }

  memcpy((void*)(g_audio_output_buffer), (void*)(g_history_buffer),
         history_samples_to_keep * sizeof(int16_t));

  int bytes_read =
      rb_read(g_audio_capture_buffer,
              ((uint8_t*)(g_audio_output_buffer + history_samples_to_keep)),
              new_samples_to_get * sizeof(int16_t), pdMS_TO_TICKS(200));

  if (bytes_read < 0) {
    ESP_LOGE(TAG, "Model could not read data from Ring Buffer");
  }

  memcpy((void*)(g_history_buffer),
         (void*)(g_audio_output_buffer + new_samples_to_get),
         history_samples_to_keep * sizeof(int16_t));

  *audio_samples_size = kMaxAudioSampleSize;
  *audio_samples = g_audio_output_buffer;
  return kTfLiteOk;
}

int32_t LatestAudioTimestamp() { return g_latest_audio_timestamp; }

Issue: Missing header esp_adc/adc_continuous.h

After adding the include, the build failed with:

fatal error: esp_adc/adc_continuous.h: No such file or directory

Fix: Add the esp_adc component dependency

Edit main/CMakeLists.txt to include esp_adc to PRIV_REQUIRES (or REQUIRES):

nano ~/keyword_spotting_tflm/main/CMakeLists.txt
idf_component_register(
  SRCS ...
  INCLUDE_DIRS .
  PRIV_REQUIRES esp_adc
)

Issue: adc_digi_output_data_t had no type1 on ESP32-C3

Build error:

error: 'const struct adc_digi_output_data_t' has no member named 'type1'

Fix: Use the ESP32-C3 struct layout (TYPE2)

Make the following changes in the file keyword_spotting_tflm/main/audio_provider.cc:

  • ADC_DIGI_OUTPUT_FORMAT_TYPE1 → ADC_DIGI_OUTPUT_FORMAT_TYPE2
  • p->type1.data → p->type2.data

Next, rebuild and reflash:

cd ~/keyword_spotting_tflm && idf.py build
cd ~/keyword_spotting_tflm && idf.py -p /dev/ttyUSB0 flash monitor

Issue: Toolchain version mismatch on ESP-IDF v6+

If the build fails with a toolchain mismatch (e.g., expected esp-15.2.0_20250929), install the ESP32-C3 toolchain:

python3 $IDF_PATH/tools/idf_tools.py install --targets esp32c3
. $HOME/esp/esp-idf/export.sh

Issue: idf.py fullclean refuses

If idf.py fullclean refuses to delete the build directory, delete it manually:

cd ~/keyword_spotting_tflm
rm -rf build
idf.py build

After switching the audio provider to ADC and aligning the ADC DMA output format for ESP32-C3, the application ran successfully and recognized the keywords “yes” and “no” over serial output. The next post will include customization for keyword spotting with additional words.

Tuesday, January 20, 2026

Hello World on ESP32-C3-Lyra V2.0 Using ESP-IDF

Flashing “Hello World” to an ESP32-C3-Lyra V2.0 on Linux (ESP-IDF)

Flashing “Hello World” to an ESP32-C3-Lyra V2.0 on Linux (ESP-IDF)

This post serves as a tutorial for how to build and flash the official ESP-IDF hello_world example to an ESP32-C3-Lyra-V2.0 from a Linux machine, then verify output over UART. This tutorial works for any ESP32-C3. Additionally, this is a precursor to the next post in this series: Keyword Spotting using ESP32-C3-Lyra V2.0

prerequisites:

Hardware

  • ESP32-C3 development board
  • USB cable
  • USB-to-UART bridge presented as CP2102N (common on many ESP32 boards)

Software

  • Ubuntu 22.04
  • ESP-IDF v5.2.3 (installed from source)

Step 1: Verify the board appears as a serial device

Plug the board in over USB and check the kernel log:

sudo dmesg -T | tail -n 30

You should see something indicating a USB-to-UART bridge and the assigned device node, for example:

  • CP2102N USB to UART Bridge Controller
  • ... now attached to ttyUSB0

That means your UART port is likely /dev/ttyUSB0.

Exit the screen using Ctrl+A then K then y

Step 2: Install required packages

Install the typical ESP-IDF build dependencies:

sudo apt update && sudo apt install -y git python3 python3-venv python3-pip cmake ninja-build ccache libffi-dev libssl-dev dfu-util libusb-1.0-0

Step 3: Install ESP-IDF (v5.2.3) + ESP32-C3 toolchain

Clone ESP-IDF and install only what you need for ESP32-C3:

cd ~ && git clone -b v5.2.3 --recursive https://github.com/espressif/esp-idf.git && cd esp-idf && ./install.sh esp32c3

Then load the environment into your current terminal session:

. ./export.sh

From this point, idf.py should be available.

Step 4: Create a local hello_world project

Copy the example out of the ESP-IDF tree (so you can edit safely later):

cd ~ && cp -r ~/esp-idf/examples/get-started/hello_world ~/hello_world

Step 5: Set the target to ESP32-C3

cd ~/hello_world && idf.py set-target esp32c3

Step 6: Build, flash, and monitor

Flash to the detected serial port and open the monitor immediately:

idf.py -p /dev/ttyUSB0 flash monitor

If you get a permissions error on /dev/ttyUSB0, rerun with sudo:

sudo idf.py -p /dev/ttyUSB0 flash monitor

To exit the ESP-IDF monitor: press Ctrl + ].

Expected output

After flashing, the monitor should show hello_world output similar to:

Hello world!
This is esp32c3 chip with 1 CPU core(s), WiFi/BLE, silicon revision v0.3, 2MB external flash
Minimum free heap size: 328280 bytes

Troubleshooting

1) idf.py: command not found

Re-run:

. ./export.sh

2) Wrong serial port

Re-run:

sudo dmesg -T | tail -n 30

Look for ttyUSB0 vs ttyACM0, then update the -p argument accordingly.

3) Permission denied on /dev/ttyUSB0

  • Use sudo as shown above, or add your user to the serial group (commonly dialout) and re-login.

Wednesday, January 8, 2025

NVIDIA's Jetson Orin Nano Super Developer Kit

NVIDIA recently unveiled their new Jetson Orin Nano Super Developer Kit, a powerful computer designed for using AI on edge devices.  Key features of the kit include a performance of up to 67 TOPS(Trillion Operations per Second), 102 GB/s of memory bandwidth, and a CPU frequency of up to 1.7 GHz. Other technical specifications found on the datasheet are a 6-core ARM Cortex-A78AE v8.2 64-bit CPU (arm-cortex-a78ae-product-brief), an NVIDIA Ampere GPU (NVIDIA Ampere Architecture) and 8GB of memory. The kit has a cost of $249 and sold out quickly. It is currently on backorder from retailers such as Sparkfun Electronics, and Seeed Studio.

NVIDIA Jetson Orin Nano Developer Kit
This new Super Developer Kit is an upgraded version of the previous Jetson Orin Nano Developer Kit. NVIDIA has provided the JetPack 6.1 SDK which can be used on existing Jetson Orin Nano Developer Kits to access features from the Super developer Kit. To unlock the super performance, users can select the latest release of JetPack, Jetpack 6.1 (rev. 1), when installing the latest SD Card image for the Kit. Detailed installation instructions can be found on the following page: JetPack SDK. 

The following table from NVIDIA highlights the main improvements of the Super Developer Kit, including the improved operating speed of up to 67 TOPS and memory bandwidth of 102 GB/s.
In this video, NVIDIA CEO Jensen Huang presents the Jetson Orin Nano Super Developer Kit.


If you are interested in learning about software compatible with the Jetson Orin Nano, check out this post in which I summarize the key features of NVIDIA's AI tools:  An Overview of NVIDIA's AI Tools For Developers

Friday, November 29, 2024

Black Friday 2024 Deals on Maker Electronics!

Here are some of the deals major online electronic retailers are offering this Black Friday!

Adafruit Industries -15% Off with code acidburn15 Hack the Holidays – Use Code acidburn15 for 15% Off « Adafruit Industries – Makers, hackers, artists, designers and engineers! 

Pololu is offering discounts (up to 50% off!) on many electronic components including Robot Chassis, motors, sensors, and much, much more! Check out the link for all details and a categorized list of all products on sale: Pololu Black Friday Sale 2024.


seeed studio Thanksgiving Sale While Thanksgiving day may be over, the seeed studio 2024 Thanksgiving Sale is happening right now! The sale includes Buy 2 get 1 Free on select products, special offers, and, for 11/29 (Black Friday!) only, a flash sale. Link to entire sale: Exclusive Sale: Up to 90% Off & Buy 2 Get 1 Free & Flash Sale & Pre-Sale Offers
Black Friday Sale on Tindie has many devices from various shops, including wifi adapters, battery testers, and much more!

Arduino Online Shop has plenty of devices on sale, including the Arduino Nano, Arduino Uno, and Nicla.Arduino Online Shop

STMicroelectronics is offering free worldwide shipping through November 30th!  Additionally, select Motor Control Evaluation Boards have discounts with code DV-ASP-BOGO-11 at checkout. eStore - STMicroelectronics - Buy Direct from ST

Raspberry Pi While not a Black Friday deal, the Raspberry Pi Compute Module is now available for $45 from the Raspberry Pi Store. It is a modular version of the Raspberry Pi 5.


2024 Black Friday Sale - BC Robotics Receive free gifts with purchases and save on select items. Additionally, there are door crasher deals.

Parts Express save 12% sitewide with code BLACKFRI24

RobotShop has up to 70% off on select products

JLCPCB:Black Friday 2024 Deals and Coupons- Coupons on PCB orders

Find any other great deals on electronics? Let me know in the comments below!

Saturday, November 2, 2024

A Guide to STMicroelectronics' Edge AI Suite Tools

STMicroelectronics has plenty of Edge AI Tools that are useful in a variety of applications.  They collectively form the ST Edge AI Suite - STMicroelectronics. All of these tools can be used free of charge with a myST user account. To create an account, click on the avatar in the top right corner of the STMicroelectronics Website. You are now ready to access the ST Edge AI Suite!

1. NanoEdge AI Studio

The first tool is NanoEdge AI Studio, it is a good place to get started with Machine Learning. 

It is also compatible with Arduino Devices.


For getting started, the following video is a good example - Anomaly Detection Demo Using Edge AI.  It uses the Accelerometer on the STEVAL-STWINKT1B board.  In a future blog post I will try this demo using some other ST Micro boards that have an accelerometer.  Additionally, the Nano Edge AI libraries can be used with any type of sensor.


To use the Datalogger Feature in NanoEdge AI Studio, a Nucleo-F411RE, ST-EVAL or similar type of board is necessary.  Here are all the Board options shown:


ST Edge AI Developer Cloud is a tool that allows users to do on remotely stored devices. You can import your own ML model or choose from ST Edge AI Model Zoo for optimization and testing. 


The following video is a getting started guide for STM32Cube.AI Developer Cloud, the predecessor of ST Edge AI Developer Cloud. While there are some differences between the two, this getting started video does have some helpful steps.  I'm also working on a blog post about getting started with the updated ST Edge AI Developer Cloud.


3. MEMS-Studio

MEMS-Studio is a software solution for using AI in embedded systems development. It can be downloaded from the linked webpage (MEMS-Studio).  Once installed an opened, you will have access to Getting Started with MEMS-Studio - User manual and Introduction-to-MEMS-studio Video.


4. STEdgeAI-Core

STEdgeAI-Core is used for compiling edge AI models on various ST MCUs MPUs, and Smart Sensors - all in one tool.  The following video gives an overview.


5. ST Edge AI Model Zoo

The ST Edge Ai Model Zoo is a collection of AI models that can be used for running on the other tools in the ST Edge AI Suite. It is comprised of three GitHub repositories: AI Model Zoo for STM32 devices, GitHub - STMicroelectronics/STMems_Machine_Learning_Core, and GitHub - STMicroelectronics/st-mems-ispu: Examples, tutorials, and other development resources for the ISPU.

6. X-CUBE-AI - AI expansion pack for STM32CubeMX 

The AI expansion pack for STM32CubeMX  is a tool used for optimizing and profiling Neural Networks and Machine Learning models for STM32.  To install this tool, open the STM32CubeIDE, and go to Help > Manage Embedded Software Packages > STMicroelectronics, then scroll down to X-CUBE-AI and click on the newest available version (9.1.0 in this case), then click "Install."  You may need to log-in on the pop up that appears for the expansion to install successfully.  Here is a screenshot of the installation screen.


7. ST High Speed Datalog

    One of the newer tools in the suite, ST High Speed Datalog is a data acquisition and visualization toolkit. It is specifically designed for applications in embedded systems and data science. The following Datalog Quick Start Guide is designed to get started with the Datalog along with the STEVAL-STWINBX1 .

8. StellarStudioAI 

    The next tool, StellarStudioAI is an AI tool for StellarStudio - development environment for Stellar automotive MCUs.  StellarStudioAI generates neural networks and converts them into C libraries for use by MCUS.

9. X-Linux-AI

    X-Linux-AI is an expansion for the STM32 MPU OpenSTLinux Distribution.  X-LINUX-AI  provides LINUX AI frameworks and application examples for use with STM32 MPUs.

10. ST ToF Hand Posture

    The final tool, ST ToF Hand Posture, is used for detecting hand gestures on STM32 MCUs using a Time-of-Flight sensor. It requires a free login to MyST to access.


This completes the summary of the ST Edge AI Tools. The first four tools listed are the best place to get started when doing AI projects for ST MCUs and MPUs.  Helpful example videos are also available for NanoEdgeAI Studio, and MEMS Studio.  For example, NanoEdge AI Studio V3 - Anomaly Detection demo and Introduction To MEMS Studio.


Monday, August 19, 2024

ST Micro eStore Free Global Delivery for August

The STMicroelectronics eStore is offering free worldwide delivery for the remainder of August.  No code or minimum purchase is required.  There are also a few buy-one-get-one-free offers with a code.

Wednesday, July 17, 2024

Ezurio Development Board Kit Giveaway

Ezurio (formerly Laird Connectivity) is offering a development kit giveaway that includes a System on Module (SOM), a carrier board, a wireless module, and an antenna. Ezurio specializes in SOMs featuring NXP i.MX processors, including the i.MX 8M Mini, 8M Plus, and i.MX 93, with support for both Android and Linux. The giveaway also includes Sona WiFi 6/6E and Bluetooth LE modules.


Monday, July 15, 2024

Machine Learning Development Boards

My name is Maxwell Clarke, I am an embedded systems engineer at Aaron Clarke where I am researching machine learning application development.  An easy way to get started with machine learning development is to use an off-the-shelf development board. Here are some development boards I've identified that support machine learning. I will be posting tutorials for some of these boards in the upcoming weeks.

Arduino Tiny Machine Learning Kit 

This kit's main purpose is to run TinyML projects by using TensorFLowLite on the board included.  It contains an Arduino Nano 33 BLE Sense board, which features the 32-bit Arm Cortex-M4 microcontroller in an nRF52840 processor from Nordic Semiconductors. The board also has sensors for proximity, motion, and many other measurements.  The kit costs $60 from the Arduino Store.


BeagleBone® AI-64 

The BeagleBone AI-64 has great computing power as it contains a Texas Instruments TDA4VM SoC with a dual 64-Bit Arm Cortex-A72 microprocessor. It interfaces via a M.2E-key PCIe USB 3.0 connector for WiFi, Ethernet, and USB 3.0. Also included are 4-Lane CSI and DSI connectors for cameras and displays, respectively. It is available for about $190 from online distributors such as Digi-Key. 


BeagleY-AI 

This board uses a TI AM67A Arm- based vision processor, which contains a 64-bit Arm Cortex-A53 Microcontroller. It also has a BM3301 BLE module for networking over BLE.  Other features include 3 displays including touchscreen support, a 10-pin Tag-Connect and 4 USB3 ports.  It is less expensive than the AI-64 as it has a cost of around $70.

This kit contains the Jetson Orin Nano 8GB, which features an Ampere GPU and a 6-core ARM CPU. It has a processing ability of up to 40 TOPS, making it the most powerful board on this list.  Due to its top performance capabilities, it cost $500 from online distributors such as SparkFun.


In December 2024, NVIDIA unveiled a new and improved version of this Jetson Kit, the Jetson Orin Nano Super Developer Kit with an improved processing power of up to 67 TOPS. This board retailed for $250 and quickly sold out. Owners of the previous Jetson Orin Nano Developer Kit can also access the super capabilities of the new kit by upgrading the SDK, more instructions can be found on this page: Jetpack SDK For more information on Super developer kit, check out my post reviewing its key features, NVIDIA's Jetson Orin Nano Super Developer Kit The following video is from NVIDIA CEO Jensen Huang, showcasing the kit's small size and high performance capabilities.


Renesas currently has a Reality AI Software which is useful for all sorts of ML applications. They also have a wide range of microcontrollers which are compatible with their software.  For example, there are RH850 Automotive MCUs for automotive applications, and RL78 Low Power 8 & 16-bit MCUs |which are good for getting started. Many of the microcontrollers such as the R7F7015813AFP-C#AA3 , which has a cost of $17, can be purchased from online distributors. 


Currently, St Microelectronics has a vast library of Edge AI tools including MEMS Studio.  These software libraries can be used for developing ML applications with STM32 boards.  For example, the X-NUCLEO-IKS4A1 is a sensor kit forSTM32 boards that can be used with MEMS Studio. Both the kit and development boards can be purchased directly from STMicro.  The X-NUCLEO-IKS4A1 costs about $33, and a new compatible board, the NUCLEO-G491RE costs about $16.


Edge Impulse is a suite of tools for conducting machine learning on edge devices.  It has different ways to get started for beginners, ML practitioners, and embedded engineers. The getting started for beginners is a good way to begin with machine learning, without much coding required.


Friday, September 10, 2021

Xilinx Adaptive Computing Challenge 2021 at hackster.io

The 2021 Adaptive Computing Challenge at hackster.io will reward top Xilinx development projects up to $10,000 (prizes are all Visa gift cards).   You can apply for free hardware to compete in the contest until October 15, 2021.  Final submissions are due February 28, 2022.  The Xilinx University Program is sponsoring an additional $2500 prize for college students.

There are three main categories in the contest: Edge Computing, Data Center AI and Big Data Analytics.  The edge computing requires a solution running on the Xilinx Kria KV260 Vision AI Starter Kit.  Data center AI must use the Xilinx VCK5000 development card.  Big data analytics requires the Xilinx Big Data Analytics card (not much information on this board).

The Kria KV260 Vision AI Starter Kit is listed at $199 but currently out of stock at most distributors.  It is meant for vision application development for Edge computing.  It has multiple camera interfaces including support for the Raspberry Pi camera module.  Multiple cameras are supported by using additional interfaces such as IAS or USB.  A power supply is also required.  One is also included in the  basic accessory pack which also includes a 13MP camera module, available from Xilinx for $59.

KV260 Vision AI Starter Kit with Basic Accessory Pack

Tuesday, December 1, 2020

Arduino Sensor Kit

Arduino and Seeed have released the Arduino Sensor Kit for $23 (USD).  The kit includes 10 modules and sensors including light, sound, air pressure, temperature, an accelerometer, buzzer, button, and a small OLED screen.  The Arduino sensor kit base is an Arduino Shield (daughterboard) so you will need an Arduino UNO or compatible board to use it.  If you buy both from Arduino you can get them bundled for a discounted price ($38.70).  The Arduino Sensor Kit can be purchased directly from Arduino or Seeed and Arduino has developed a step-by-step tutorial to go with it and the Arduino UNO. 

Seed has a very similar all-in-one board, the Seeed Grove Beginner Kit for Arduino ($19.90), which includes an Arduino compatible base board.

Monday, November 30, 2020

Electronics Deals Cyber Monday 2020

Cyber Monday electronics deals are here.  Many of the deals listed in my blog post on Black Friday are still available from Adafruit, Polulu, SparkFun, and Tindie.

1BitSquared has a 15% discount off any piece of hardware with the checkout code BLACKFRIDAY2020 through Midnight (US PST).  They have a few unique development boards and JTAG accessories.  They have hard to find JTAG adapters and cables that are useful for ARM processor debugging.  I have used the Black Magic 0.1in Pin Header JTAG cable for STM32 debugging.  They also have STM32 and FPGA development boards and the Black Magic Probe for ARM Cortex MCUs.

MikroE is having deals until Tuesday December 1st on many products.  This includes 25% off most Click Boards.  These are small accessory boards that use the microBUS socket available on many different development boards including the low cost Microchip Curiosity Development Boards.  MicroBus Click Boards are great for prototyping or general DIY projects.  You can add just about any sensor, analog or digital interface, or communications module you would need.
RobotShop is discounting specific products from 5% to 50% for it's Cyber Monday sale.  Of course this includes robot kits and parts, but you can also find Arduino boards, electronic learning kits, drones and Raspberry Pi development boards.

Friday, November 27, 2020

Electronics Deals Black Friday 2020

Black Friday is a great time to get a new development board or some parts for a DIY electronics project.  Here are a few great online electronics stores where you can find deals.

Adafruit is having two sales, one is for 15% all items in stock with the code ADATHX see more details in the Adafruit Thanksgiving Weekend Sale blog post.  The Adafruit Feather line of development boards is 20% off today only with the same code, see Adafruit Feather Friday Sale for details.

Polulu has a few different Black Friday deals.  There are coupons for individual products, discounts on your entire order and the unique design your own deal sale.  Follow this link to Pololu Black Friday/Cyber Monday Sale 2020 for the details.

The design your own deal allows you to propose propose a discount for up to three products.  Last year I was able to get even bigger discounts than I asked for.  I don't recall the original prices but I was pleasantly surprised that they were all approved and discounted further.  Here are my three wishes and the deals I was offered.

You requested: 1 at $12.00 each.
We can do even better!  Up to 3 at $8.88 each.

You requested: 1 at $3.00 each.
We can do even better!  Up to 3 at $2.75 each.
   

You requested: 1 at $15.00 each.
We can do even better!  Up to 3 at $14.00 each.

SparkFun Black Friday Deals are discounts from 15 to 60 percent off select products.  There are not as many deals here but you might get lucky and find something you want.  You can also check out this sneak peak of Cyber Monday Deals.

At the Black Friday Sale on Tindie many development boards are discounted.  Tindie is a unique online store featuring independent sellers of all kinds of development boards and accessories for unique applications.   If you haven't been to this site before it's a great time to look around.

Friday, October 30, 2020

SparkFun A La Carte Custom Board Designer

SparkFun Electronics is offering a web based custom board design service called SparkFun A La Carte (ALC).  You can choose from a few different microcontrollers that can run Arduino programs.  You also have a choice of I/O, connectors and power options.  Communications options include RFID, WiFi and Bluetooth.  There is a one-time design fee for each board and a per unit cost calculated as you add the components.  You can get a 50% discount on the design fee until 12/31/2020 with the promocode ALCSPARKFUN50. For more information see this ALC post on the SparkFun Blog  

This YouTube video on the custom board designer goes over an example design.


Monday, December 17, 2018

Lattice Development Board Sale and New Crowd Funded Board

Lattice has three boards on sale until December 31, 2018, click on the board links to learn more.
MachXO3-9400 Development Board - MachXO3LF-9400C PLD - includes Arduino and Raspberry Pi connectors -  $39


Embedded Vision Development Kit - FPGA for embedded vision systems - $199


iCE40 UltraPlus Breakout Board - FPGA for mobile and IoT - $49


If you are interested in learning how to program the iCE40 with open source tools and hardware see the recently funded iCEBreaker FPGA project by 1BitSquared.


Thursday, February 8, 2018

Atmel-ICE and Development Board Sale at Microchipdirect.com

The Atmel-ICE Full Kit is half off with coupon code TP1747 until February 28, 2018.  A few other development boards are discounted as well.  See details at http://www.microchipdirect.com/product/DevToolDeals


I have used the Atmel-ICE with a few different AVR microcontrollers along with the Atmel Studio 7.  It works well but I have had a few small issues with JTAG debugging from Atmel Studio, usually I just restart the debug session and things work.  Definitely the best tool I have found for AVR JTAG debugging. For more information see the the Atmel-ICE product page.  The link to the online user's guide on that page is currently broken, I will add it to the comments if I can find a link.  Here is the Atmel-ICE User Guide at DigiKey.  The Youtube video Atmel Edge With Paul Rako: Debug 102 shows and unboxing and goes over the basics of the kit.  The video is embedded below (no pun intended).


Tuesday, March 21, 2017

Lattice FPGA Development Kit and Development Tools Sale

Lattice Semiconductor is offering big discounts on ECP5 FPGA development boards and development tools while supplies last until March 31, 2017 UPDATE: promotion has been extended to June 30, 2017 while supplies last.

Items on sale for less than $100 US include the ECP5 Versa Development kit ($110 discount), the ECP5-5G Versa Development Kit ($150 discount), the Connectivity IP Suite ($896 discount), and the Lattice Diamond FPGA Design Software 12 month subscription ($796 discount).   The development kits include a free limited version of the Lattice Diamond Software so you can have a powerful ECP5 FPGA development kit with tools for only $89.


Tuesday, February 23, 2016

TI Development Board Deals for Engineers Week 2016

This week the AM437x starter kit is only $99 ($149 off with coupon code EWKDEAL10).  It's engineers week and TI has 12 deals on it's best-selling products while supplies last.  There are deals on a few SensorTags, LaunchPads, BoosterPacks and EVMs.

The AM437x starter kit (TMDXSK437X) has a 4.3" capacitive touch screen LCD, on board camera module and connector for a Wilink8 evaluation board.  The Wilink8 bundle is also on sale for engineers week (coupon code EWKDEAL12), it supports WiFi, Bluetooth, and Bluetooth Low Energy and includes a Wilink8 EVN and an SDIO board to connect the wilink to hosts with generic SD/MMC card slots.

Wednesday, December 16, 2015

World's Largest Arduino Maker Challenge

The World's Largest Arduino Maker Challenge is being hosted on  Hackster.io partnered with Adafruit, Arduino, Atmel, and Microsoft.

World's Largest Arduino Maker Challenge

There will be 1000 participants in the contest - selected based on project ideas in phase 1. Winners in phase 1 receive an Arduino MKR1000 (US only) and  Genuino (outside US).  In phase 2, three winners will be selected and win travel to a Maker Faire to present the project and a $500 gift certificate to Adafruit.


Monday, May 18, 2015

BeagleBone Black Development Part 6 - Remote Application Debugging With Eclipse

This tutorial shows how to debug a BeagleBone Black  application remotely using the Eclipse IDE. This is similar to a post I made last year but with updates for BeagleBone Black Rev. C and Debian Jessie on the host machine and on the board.

This is part six in a series of tutorials that show how to develop for Beaglebone Black starting from a new install of Debian Jessie on a host machine in Part 1, and Part 2.  Part 3 covers cross-tool setup for BeagleBone Black. BeagleBone Black kernel build steps are in Part 4 and installing Linux to eMMC using Micro SD is covered in part 5.

6.1 Install GDB server on the BeagleBone Black


A GDB server can use any IP connection to debug.  You can use ethernet port (eth0), the USB device port (usb0), a USB to Ethernet adapter on the USB host port (eth1) or a USB to WIFI device.  


See the USB gadget section of Beaglebone Black - Linux on ARM to set up usb0.
https://eewiki.net/display/linuxonarm/BeagleBone+Black#BeagleBoneBlack-usbgadget


To use a USB-to-ethernet device in the host port, you need to build a kernel configured with drivers for your device.  The drivers can be found in menuconfig in Device drivers>Network device support>USB Network Adapters.


Connect the FTDI USB to serial port and log into the console and power up the Beaglebone Black.


The following commands with usernames that end with @arm are executed in the serial terminal program on the BeagleBone Black, not on the host used to cross-compile the kernel.


debian@arm:~$ sudo apt-get update
debian@arm:~$ sudo apt-get install gdbserver


6.2 Eclipse IDE Setup on Development Host


Eclipse is a large install package, it will take a little while to complete. Enter these commands on the Linux cross-development host machine.
user@debian:~$ sudo apt-get install eclipse eclipse-cdt  eclipse-cdt-launch-remote


Make a workspace for a test application.
user@debian:~$ mkdir ~/bbb/testws


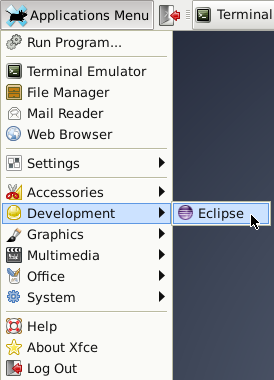
Start Eclipse from the Applications Menu.  Be patient, the first run takes a long time to load.


Browse to the workspace directory we created and click OK.


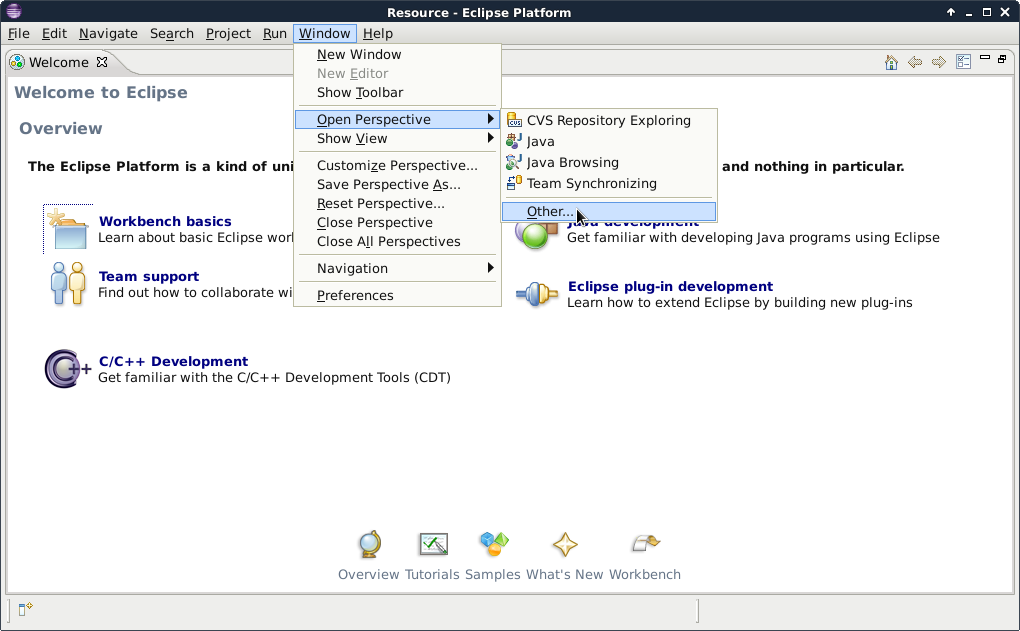
Eclipse will come up with a welcome screen.  Select Window, click Open Perspective, Other...
eclipse-open-perspective-other.png
open-c-cpp-perspective.png


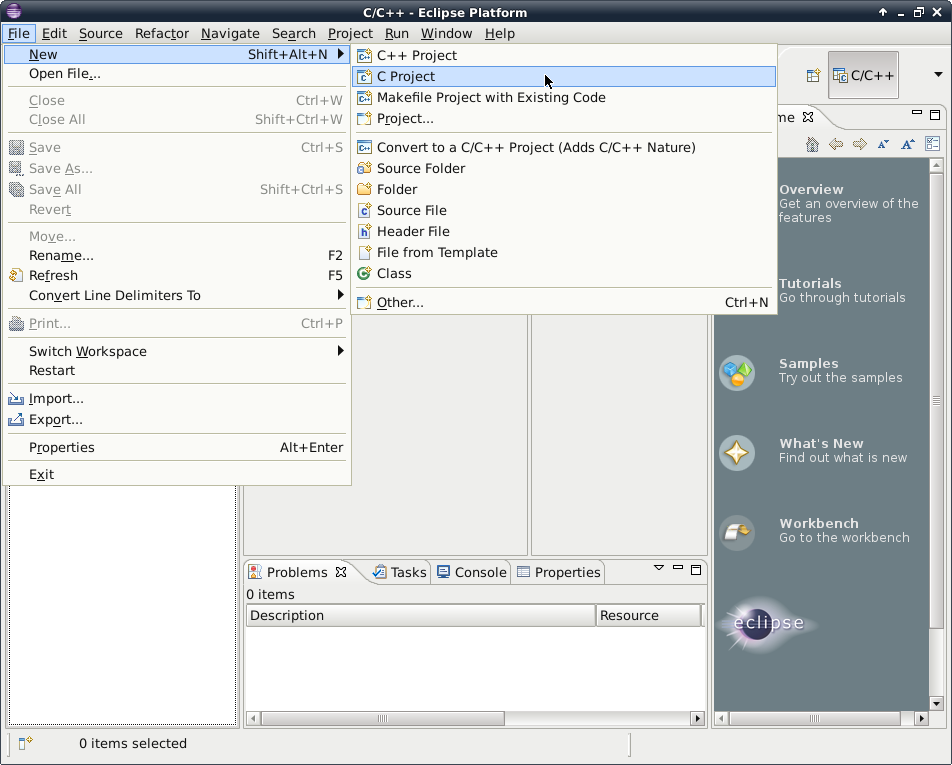
Create a new C project using File, New then selecting C Project.


Name the project, select project type Hello World ANSI C Project, select Toolchain Cross GCC, click next.


The next screen asks for basic properties, you can just enter an author and click next.


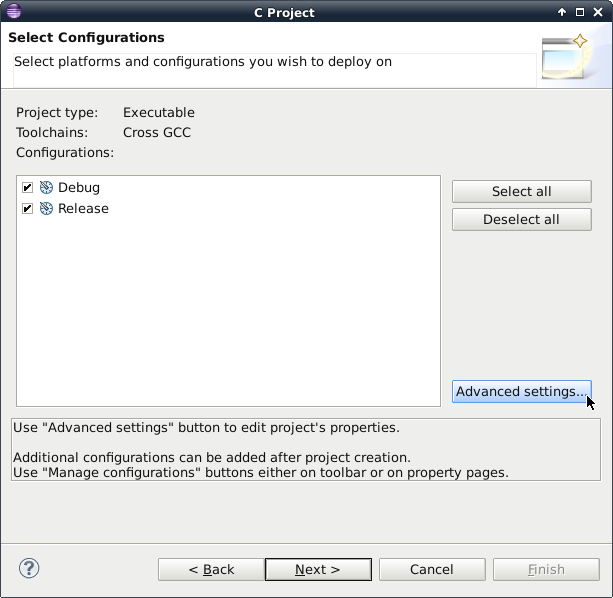
The Select Configurations window will appear, click on Advanced settings.


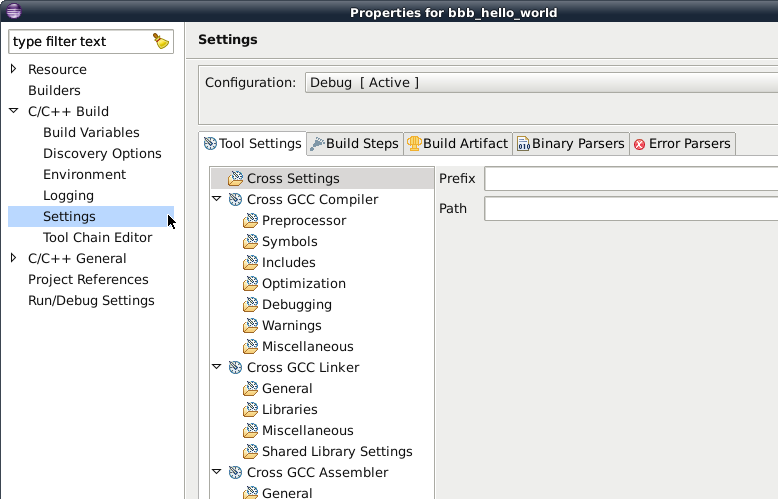
In the settings window on the left hand side open up C/C++ Build -> Settings to bring up the Tool Settings tab for the Debug configuration.


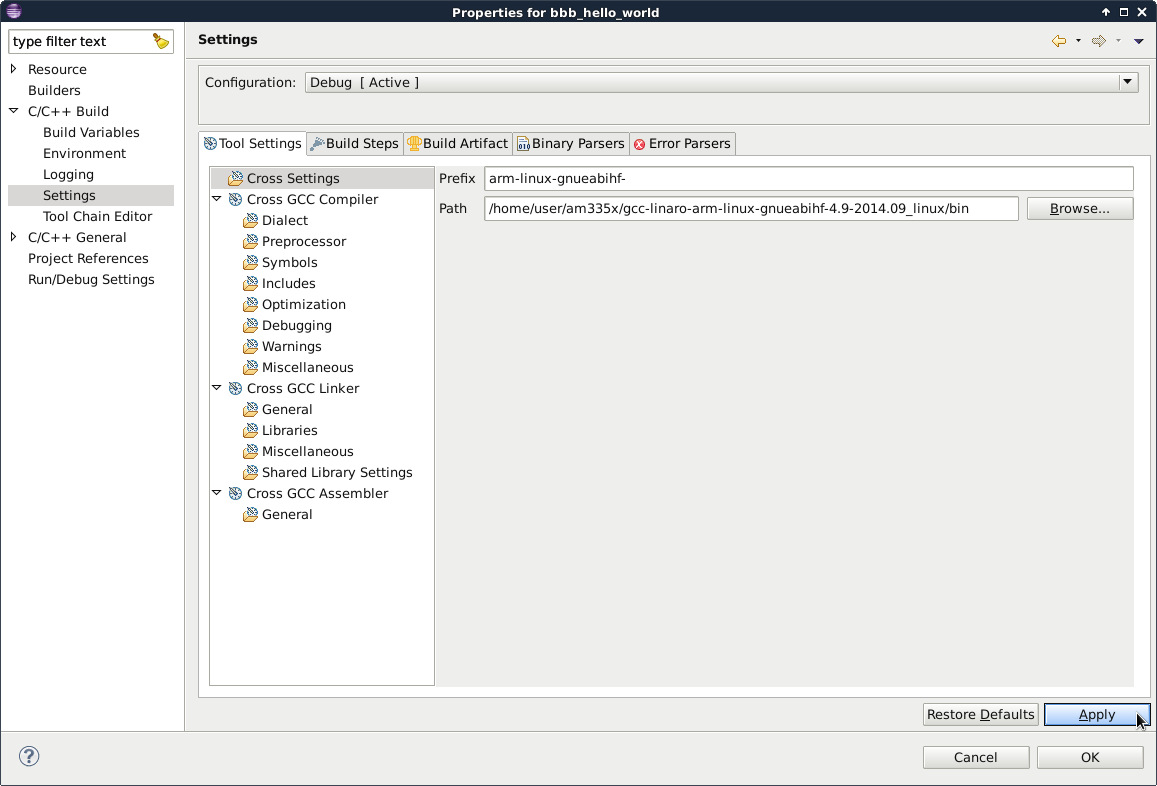
Select Cross Settings.  Set the prefix to arm-linux-gnueabihf-  and set the path of the tools we installed earlier (Section 3.2).  If you created the armcc-vars file in that section it will show the path.  
user@debian:~$ cat ~/am335x/armcc-vars
export CC=/home/user/am335x/gcc-linaro-arm-linux-gnueabihf-4.9-2014.09_linux/bin/arm-linux-gnueabihf-
export ARCH=arm
export CROSS_COMPILE=${CC}


In the example file above the prefix is arm-linux-gnueabihf- and the path to enter is:
/home/user/am335x/gcc-linaro-arm-linux-gnueabihf-4.9-2014.09_linux/bin


Properties for bbb_hello_world.png


Click Apply, then click OK.  You should go back to C Project screen, click Next.C Project Next.png


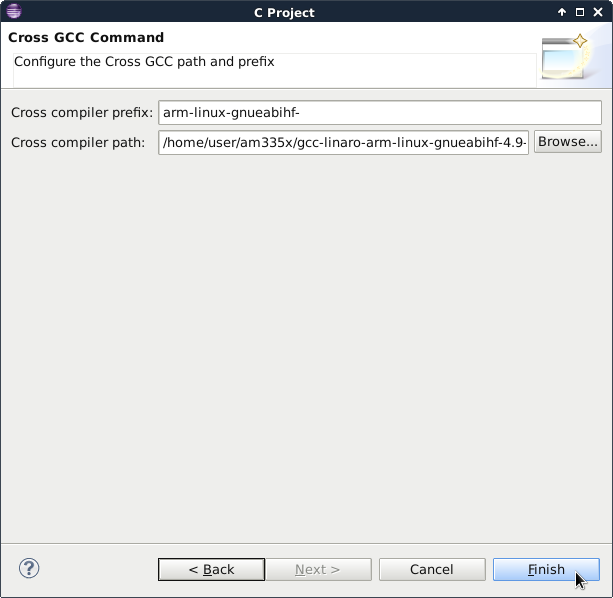
You should see the next screen asking for the same values we just entered (seems like a bug in eclipse).  Just enter the values for prefix and path one more time and click Finish.
C-project-cross-gcc-command.png


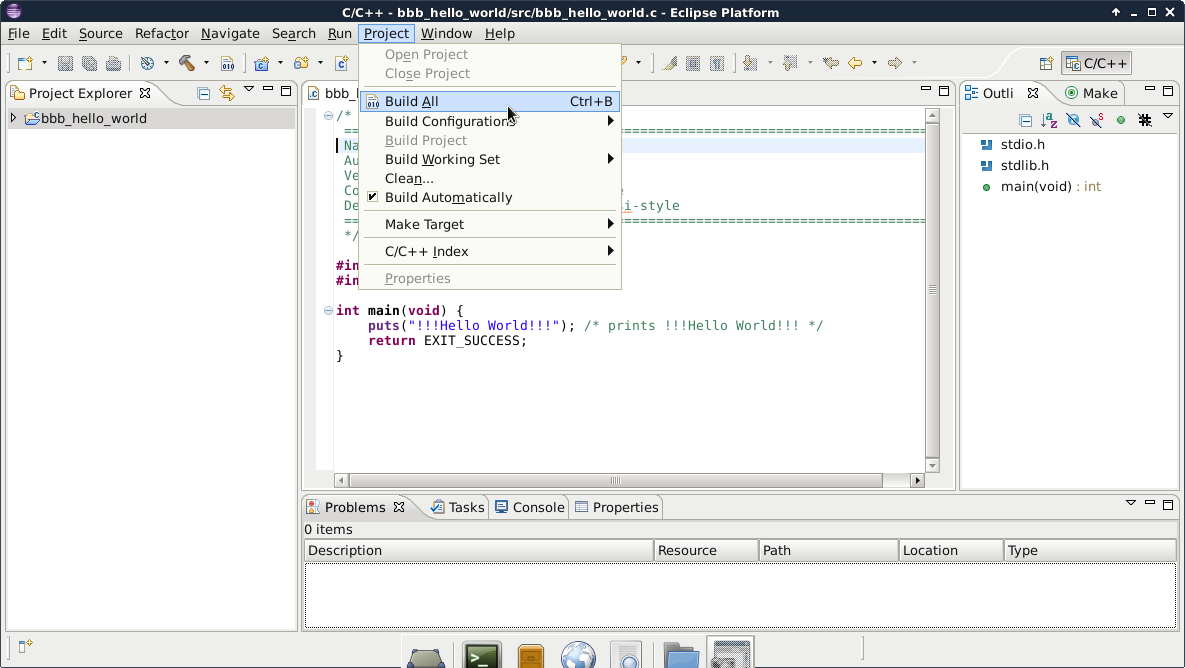
This brings up a workspace with the hello world C source file open.  Build the project using Project menu, Build All and you should see the prefix we entered being used for the tools (gcc).


eclipse-c-project-debug.png


You should not see any errors in the console tab at the bottom of the page.


6.3 Eclipse Remote Connection Setup


The eclipse remote connection will require some changes on the BeagleBone Black.  Make a serial port connection or ssh into a console.


First check the IP address of the port we will use for debugging.  Use the ifconfig command and write down the inet addr shown.  Ethernet port (eth0) information shown below.
debian@arm:~$ sudo ifconfig
[sudo] password for debian:
eth0      Link encap:Ethernet  HWaddr 1c:ba:8c:e1:7f:ae  
         inet addr:192.168.1.140  Bcast:192.168.1.255  Mask:255.255.255.0
         inet6 addr: fe80::1eba:8cff:fee1:7fae/64 Scope:Link
         UP BROADCAST RUNNING MULTICAST  MTU:1500  Metric:1
         RX packets:22706 errors:0 dropped:0 overruns:0 frame:0
         TX packets:205 errors:0 dropped:0 overruns:0 carrier:0
         collisions:0 txqueuelen:1000
         RX bytes:1790146 (1.7 MiB)  TX bytes:23064 (22.5 KiB)
         Interrupt:40


We will need ssh installed and running on the BeagleBone Black for eclipse remote debugging.


Test ssh from the development host machine using the IP address we just found for the port..
user@debian:~$ ssh debian@192.168.1.140


If there are any problems check to make sure an ssh server is installed.
debian@arm:~$ dpkg -s openssh-server
If not install openssh server.
debian@arm:~$ sudo apt-get install openssh-server


If ssh is installed but you have trouble connecting to the board some host key files might be missing.
Check for ‘Could not load host key’ errors in /var/log/auth.log using grep.
debian@arm:~$ grep sshd /var/log/auth.log


If you see this problem you can regenerate the individual keys or just regenerate all by reconfiguring openssh server.
To reconfigure, first delete any existing host keys.
debian@arm:~$ sudo rm /etc/ssh/ssh_host_*
Next, generate all new key files.
debian@arm:~$ dpkg-reconfigure openssh-server


If for some reason you need to regenerate individual keys see Phillip’s Tech Blog: Could not load host key.


Once ssh is working from the host the next step is to add another user to the BeagleBone for the remote debug connection.


Create a user with the same name as the user you created for Debian on the host virtual machine.  In this document the name is just ‘user’ for simplicity.  To be clear, if you are logged in and running eclipse as a user ‘joe’ in the host debian virtual machine, you will create a new user named ‘joe’ on the BeagleBone Black to log in with eclipse ssh for debugging.  This might not be absolutely necessary, but I haven’t found the place to change the remote username, it seems eclipse expects the remote system to have the same username (but allows you to change the remote password).
debian@arm:~$ sudo adduser user
[sudo] password for debian:
Adding user `user' ...
Adding new group `user' (1001) ...
Adding new user `user' (1001) with group `user' ...
Creating home directory `/home/user' ...
Copying files from `/etc/skel' ...
Enter new UNIX password:
Retype new UNIX password:
passwd: password updated successfully
Changing the user information for user
Enter the new value, or press ENTER for the default
       Full Name []:
       Room Number []:
       Work Phone []:
       Home Phone []:
       Other []:
Is the information correct? [Y/n] Y
Adding new user `user' to extra groups ...
Adding user `user' to group `dialout' ...
Adding user `user' to group `i2c' ...
Adding user `user' to group `spi' ...
Adding user `user' to group `cdrom' ...
Adding user `user' to group `floppy' ...
Adding user `user' to group `audio' ...
Adding user `user' to group `video' ...
Adding user `user' to group `plugdev' ...
Adding user `user' to group `users' …
debian@arm:~$ exit
logout


Debian GNU/Linux 7 arm ttyO0


default username:password is [debian:temppwd]


arm login: user
Password:
Linux arm 3.8.13-bone70.5 #1 SMP Wed Mar 11 16:37:28 EDT 2015 armv7l


The programs included with the Debian GNU/Linux system are free software;
the exact distribution terms for each program are described in the
individual files in /usr/share/doc/*/copyright.


Debian GNU/Linux comes with ABSOLUTELY NO WARRANTY, to the extent
permitted by applicable law.
user@arm:~$


Create a workspace and project directory.
user@arm:~$ mkdir ~/remotews                                                  
user@arm:~$ mkdir ~/remotews/hello                                            
user@arm:~$ chmod a+w ~/remotews/hello/
                       
Next we will set up the host using eclipse.  
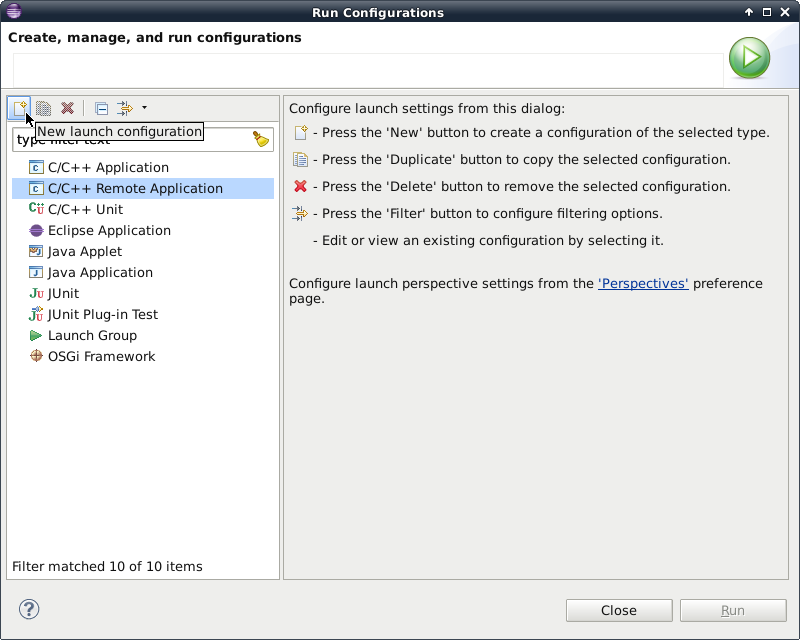
On the Eclipse Run menu, click Run Configurations. Select C/C++ Remote Application, press the New launch configuration button.


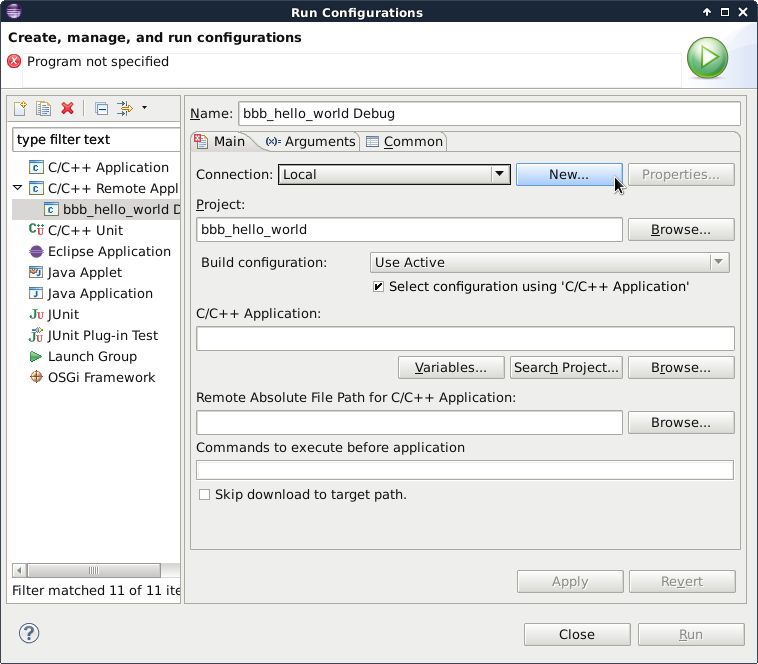
On the next window the bbb_hello_world Debug run configuration is selected.  On the main tab click New.


run configurations connection new.png


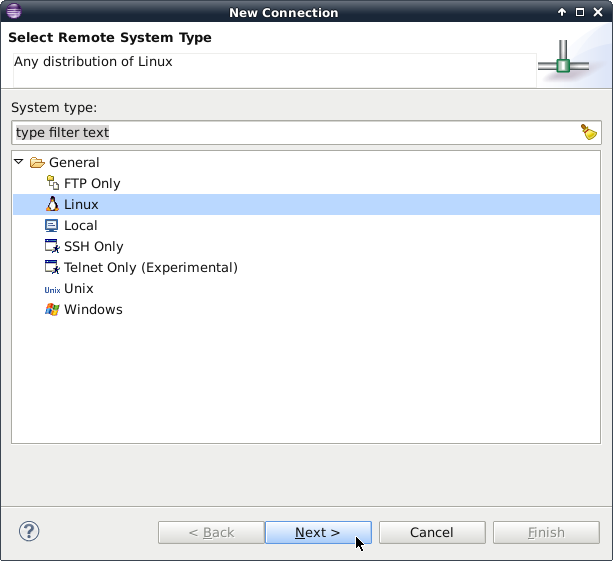
In the New connection window for system type click Linux then next.  


In the next window we will enter the BeagleBone Black IP address for the host name and give a connection name and description.  


Enter the internet address of the port as the Host name.  Click the Verify host name box so it is not checked.


new connection description.png


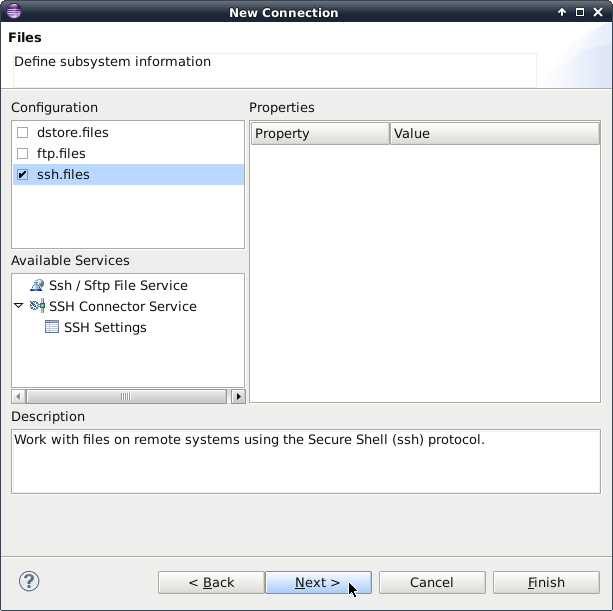
In the next screen check the box for ssh.files and click Next.


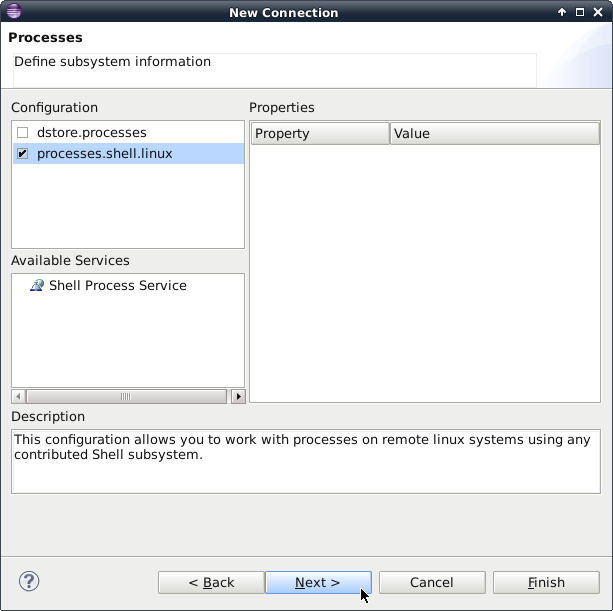
In the Next window click the box for processes.shell.linux and click Next.


On the next screen click ssh.shells and Next.


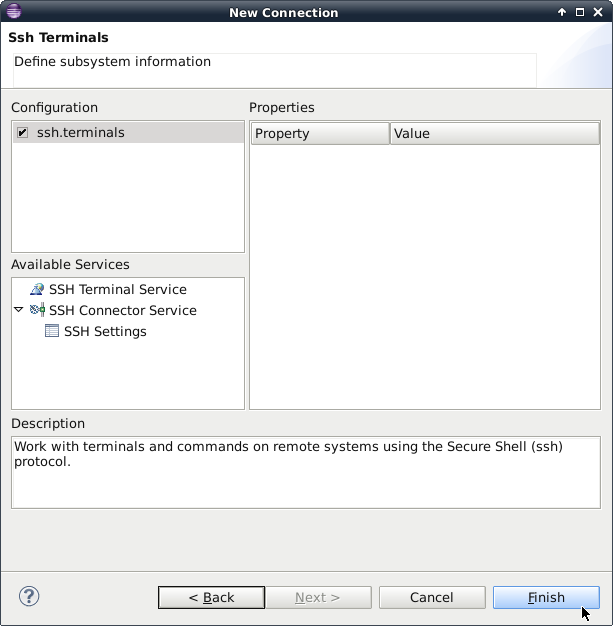
The next window select ssh.terminals (should be default) and click Finish.


This will return you to the Run Configurations window.
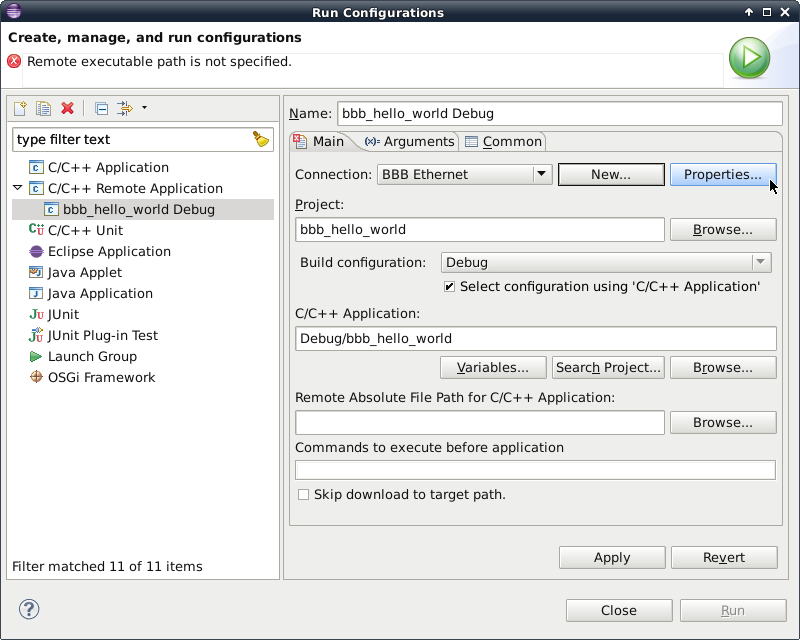
In the Main tab, select BBB Ethernet for Connection then click Properties to the right.


Enter the path to the remote workspace and click OK.  


Next in the Main tab, enter the remote absolute path to the executable application binary.  The absolute path of the executable file will be /home/user/remotews/hello/bbb_hello_world.


Enter ‘chmod +x /home/user/remotews/hello/bbb_hello_world’  in the field ‘commands to execute before application’ to allow the executable to run after it is uploaded to the board.


After both values have been entered click Apply then click Run.  If Run is greyed out so you can’t continue then I have found it easiest to just delete the bbb_hello_world Debug configuration and back up a few steps to creating a new launch configuration.  You won’t have to re-enter the connection information but you need to enter the remote absolute file path and commands to execute again.
Click Run.  Wait a few seconds for the Enter Password window to appear.  Enter the username and password for the BeagleBone Black and click OK.


A secure storage window will appear, choose a password, this is an eclipse feature not required for the ssh connection.


Even though we entered save password above, a ‘Password required’ window might  appear for your ssh connection (possibly only the first time).  Enter the ssh username and password again to connect to the beaglebone black.


If an authenticity of host key warning appears, click Yes.


After a successful run the console will be displayed in the lower Eclipse window.  It will show the output of the remote program.
echo $PWD'>'
chmod +x /home/user/remotews/hello/bbb_hello_world;/home/user/remotews/hello/bbb_hello_world;exit
Last login: Thu Mar 26 15:43:10 2015 from earth
user@arm:~$ echo $PWD'>'
/home/user>
user@arm:~$ chmod +x /home/user/remotews/hello/bbb_hello_world;/home/user/remote ws/hello/bbb_hello_world;exit
!!!Hello World!!!
logout


6.4 Eclipse GDB Debugging Setup


Open a terminal on the host Linux system.  Change to the Debug directory for the project and create an empty .gdbinit file.
user@debian:~$ cd ~/bbb/testws/bbb_hello_world/Debug/
user@debian:~/bbb/testws/bbb_hello_world/Debug$ touch .gdbinit


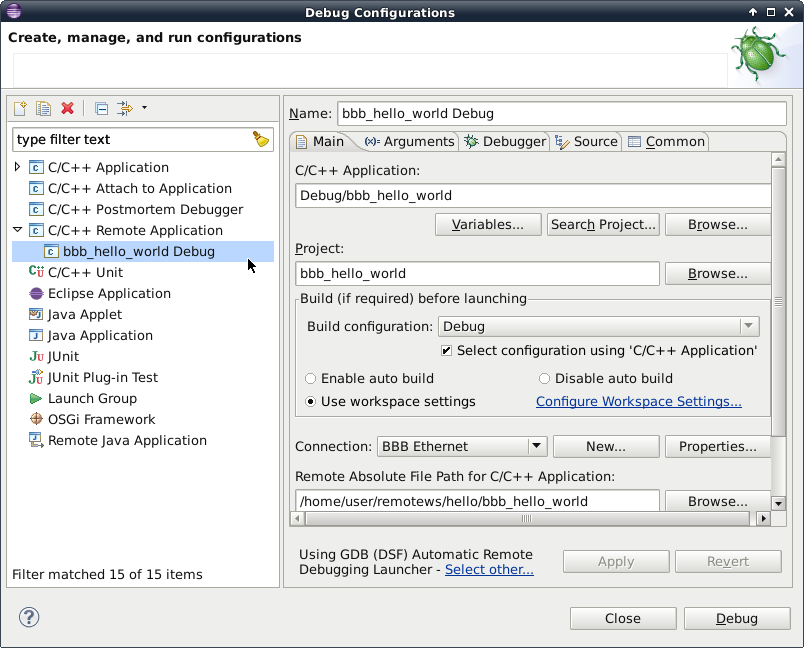
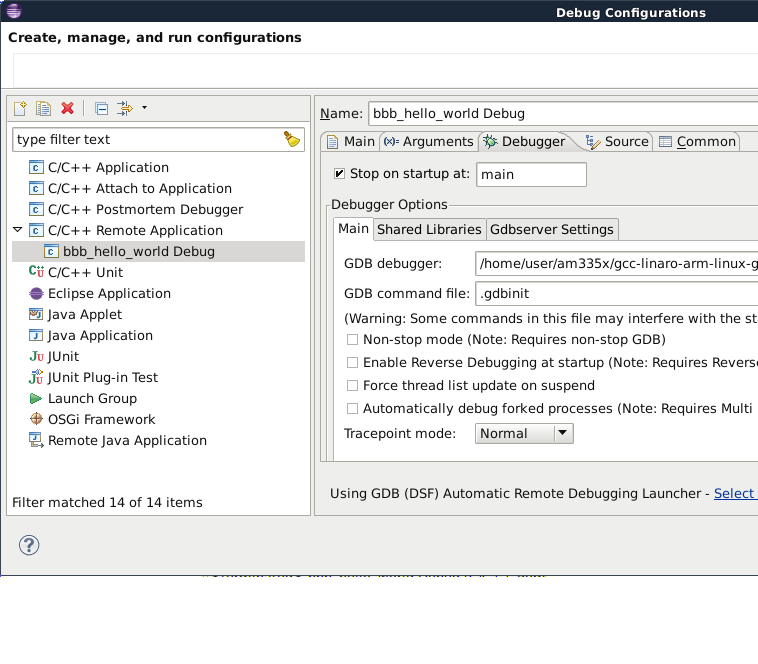
Open Eclipse, open the Run menu in the menu bar and click Debug Configurations. Select bbb_hello_world Debug under C/C++ Remote Application.


Open the Debugger tab.  This has three tabs for Debugger Options, click the Main tab.
debug configuration main tab.png


Click the Browse button for GDB debugger to find the gdb executable from the host toolchain (arm-linux-gnueabihf-gdb).  
debug browse gdb.png
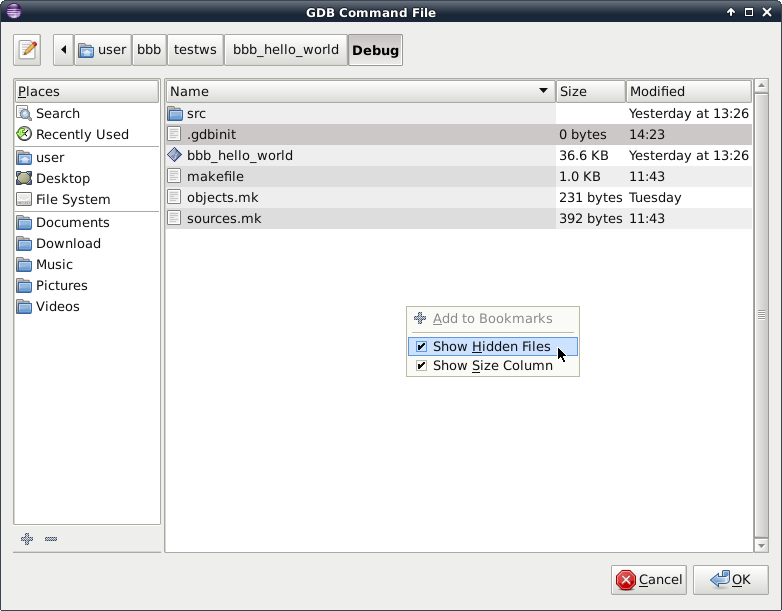
Next click the browse button next to GDB Command file, to locate it you will need to Right-click to show hidden files to see it.  After you find it select it and click OK.


After entering the debugger and command file click Apply.
Now click Debug in the lower right hand corner of the Debug Configurations window to test the setup.  The first time you will get a confirmation window.


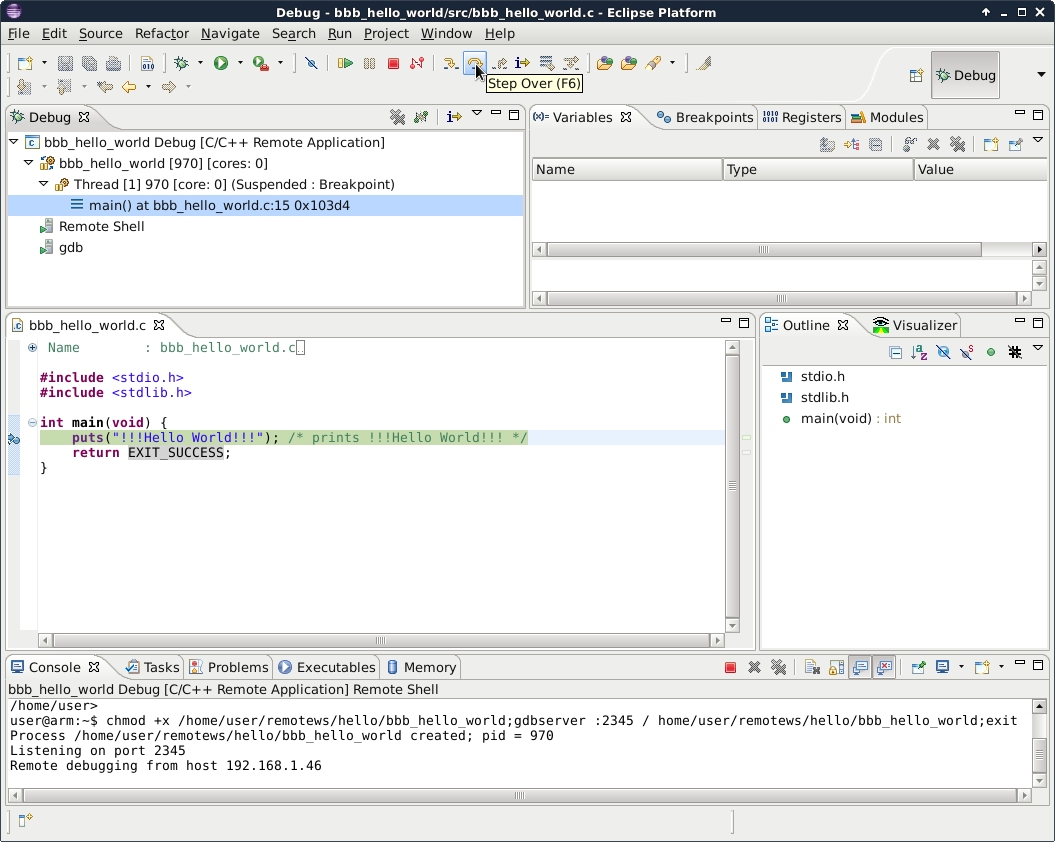
The Debugger will stop before the first line of the program.   Mouse over the icons to get descriptions of the debugger commands or use the Run menu.  See the Eclipse Help menu for more information on the Debug commands.
Debug-bbb_hello_world.png


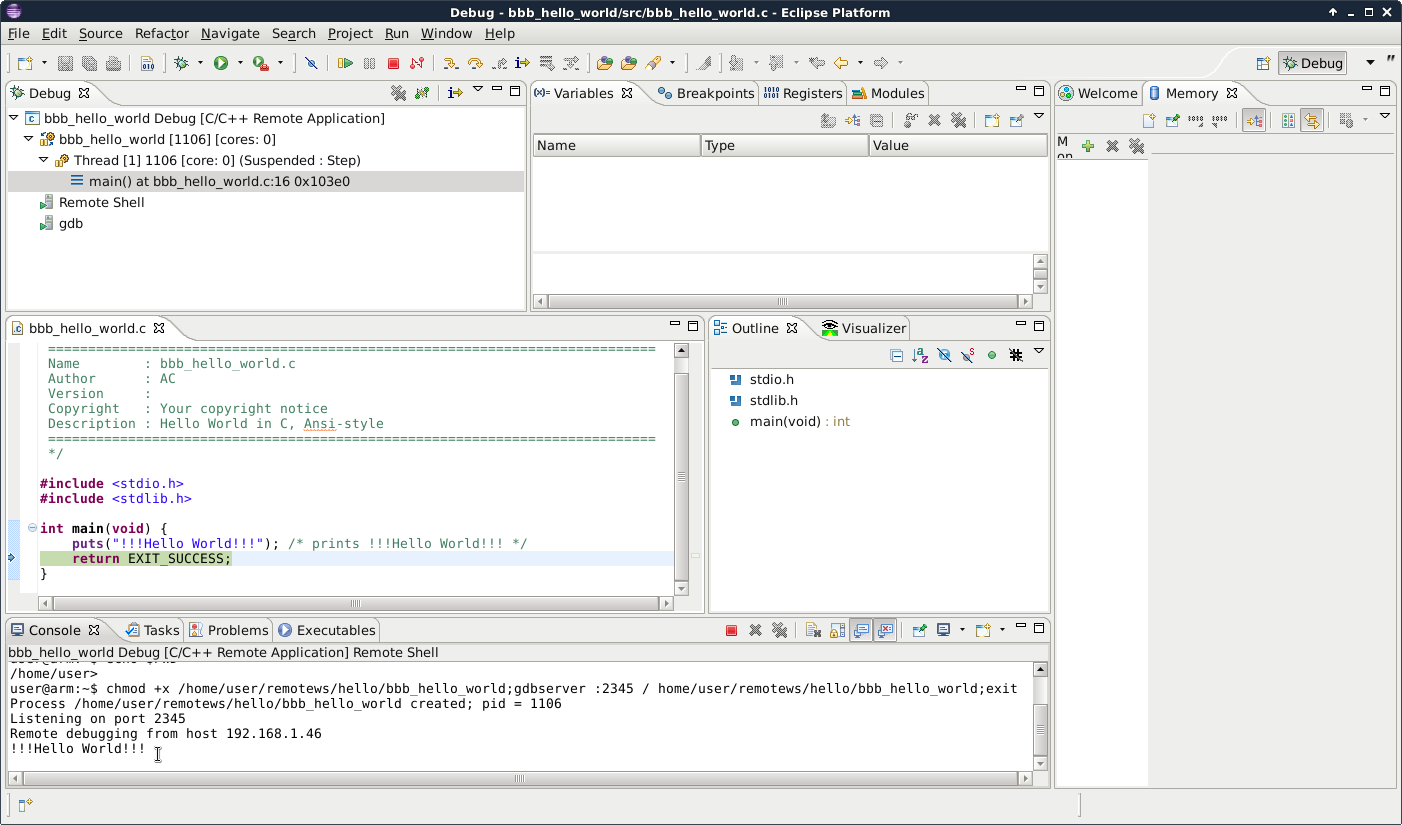
F6 will step over so you can see the !!!Hello World!!! output in the Console window.
Debug hello world success.png


If this works you are finished setting up eclipse.  You should be able to debug your own programs using this setup as a guide.