Showing posts with label embedded Linux. Show all posts

Friday, January 30, 2026

Keyword Spotting on ESP32-C3-Lyra V2 Using ESP-IDF

ESP32-C3 Keyword Spotting (TFLite Micro micro_speech) with Onboard Mic (ADC)

ESP32-C3 Keyword Spotting (“Yes/No”) with TFLite Micro micro_speech using the Onboard Mic (ADC)

This post documents how to run TensorFlow Lite for Microcontrollers (TFLM) (now branded as LiteRT for Microcontrollers) keyword spotting example (micro_speech) on an ESP32-C3 board, and how to adapt the example to use the onboard analog microphone routed through the ESP32-C3 ADC. To set up the ESP32-C3-lyra V2, see this post: Hello World on ESP-32-C3-Lyra V2.0

Environment / Versions

  • Target board: ESP32-C3 (ESP32-C3-Lyra)
  • ESP-IDF version: v6.x (or v6.0-dev)
  • Example project: esp-tflite-micro:micro_speech (keyword spotting “yes/no”)
Note (ESP-IDF v6+): ESP-IDF v6 removed the legacy ADC header (driver/adc.h) and renamed some ADC attenuation enums. The ADC code below reflects those v6+ changes.

Command Log

1) Load the ESP-IDF environment

. $HOME/esp/esp-idf/export.sh

2) Create a new project from the micro_speech example

cd ~
idf.py create-project-from-example "espressif/esp-tflite-micro=1.3.0:micro_speech"
mv ~/micro_speech ~/keyword_spotting_tflm

3) Set the target to ESP32-C3

cd ~/keyword_spotting_tflm && idf.py set-target esp32c3

4) Install/verify ESP-IDF tools for ESP32-C3 (v6+ toolchain)

python3 $IDF_PATH/tools/idf_tools.py install --targets esp32c3
. $HOME/esp/esp-idf/export.sh

5) Build

cd ~/keyword_spotting_tflm && idf.py build

6) Flash and open the serial monitor

cd ~/keyword_spotting_tflm && idf.py -p /dev/ttyUSB0 flash monitor
Exit the monitor: Press Ctrl + ]

Troubleshooting

Issue: Default example tried I2S and failed

The upstream micro_speech project’s audio capture path attempted to configure I2S pins (I2S microphone). On this setup, we used the onboard mic through ADC instead. The following error occurs:

E (...) i2s_set_pin(...): bck_io_num invalid
E (...) TF_LITE_AUDIO_PROVIDER: Error in i2s_set_pin

Fix: Switch audio capture from I2S to ADC continuous sampling

Key points of the ADC implementation:

  • Use esp_adc/adc_continuous.h continuous mode to sample at 16 kHz.
  • Convert 12-bit unsigned ADC samples into signed 16-bit PCM-like samples centered around mid-scale.
  • Write samples into the existing ring buffer so the model’s GetAudioSamples() continues to work.

Replace audio_provider.cc with the working ADC version (ESP32-C3 TYPE2) by replacing the entire contents of:

~/keyword_spotting_tflm/main/audio_provider.cc

with the following code:

/* ADC-based audio provider for ESP32-C3-Lyra (MIC_ADC on IO0 / ADC1 CH0) */

#include "audio_provider.h"

#include <cstring>

#include "freertos/FreeRTOS.h"
#include "freertos/task.h"

#include "esp_log.h"

#include "esp_adc/adc_continuous.h"

#include "ringbuf.h"
#include "micro_model_settings.h"

static const char* TAG = "TF_LITE_AUDIO_PROVIDER";

ringbuf_t* g_audio_capture_buffer;
volatile int32_t g_latest_audio_timestamp = 0;

constexpr int32_t history_samples_to_keep =
    ((kFeatureDurationMs - kFeatureStrideMs) * (kAudioSampleFrequency / 1000));
constexpr int32_t new_samples_to_get =
    (kFeatureStrideMs * (kAudioSampleFrequency / 1000));

const int32_t kAudioCaptureBufferSize = 40000;

namespace {
int16_t g_audio_output_buffer[kMaxAudioSampleSize * 32];
bool g_is_audio_initialized = false;
int16_t g_history_buffer[history_samples_to_keep];

adc_continuous_handle_t g_adc_handle = NULL;

// Read buffer (raw ADC frames)
static constexpr size_t kAdcReadBytes = 1024;
uint8_t g_adc_read_buf[kAdcReadBytes];

// Temporary PCM buffer (int16)
int16_t g_pcm_buf[kAdcReadBytes / sizeof(adc_digi_output_data_t)];

// ESP32-C3-Lyra MIC_ADC is routed to IO0 => ADC1 channel 0
static constexpr adc_unit_t kAdcUnit = ADC_UNIT_1;
static constexpr adc_channel_t kAdcChannel = ADC_CHANNEL_0;
static constexpr adc_atten_t kAdcAtten = ADC_ATTEN_DB_12;
static constexpr adc_bitwidth_t kAdcBitwidth = ADC_BITWIDTH_12;
}  // namespace

static void adc_init_continuous() {
  adc_continuous_handle_cfg_t handle_cfg = {
      .max_store_buf_size = 4096,
      .conv_frame_size = 1024,
  };
  ESP_ERROR_CHECK(adc_continuous_new_handle(&handle_cfg, &g_adc_handle));

  adc_digi_pattern_config_t pattern = {};
  pattern.atten = kAdcAtten;
  pattern.channel = kAdcChannel;
  pattern.unit = kAdcUnit;
  pattern.bit_width = kAdcBitwidth;

  adc_continuous_config_t dig_cfg = {};
  dig_cfg.sample_freq_hz = kAudioSampleFrequency;  // 16 kHz
  dig_cfg.conv_mode = ADC_CONV_SINGLE_UNIT_1;

  // ESP32-C3 DMA output uses TYPE2 layout
  dig_cfg.format = ADC_DIGI_OUTPUT_FORMAT_TYPE2;

  dig_cfg.pattern_num = 1;
  dig_cfg.adc_pattern = &pattern;

  ESP_ERROR_CHECK(adc_continuous_config(g_adc_handle, &dig_cfg));
  ESP_ERROR_CHECK(adc_continuous_start(g_adc_handle));
}

static inline int16_t adc12_to_pcm16(uint16_t adc12) {
  int32_t centered = (int32_t)adc12 - 2048;
  int32_t pcm = centered << 4;  // scale 12-bit to ~16-bit
  if (pcm > 32767) pcm = 32767;
  if (pcm < -32768) pcm = -32768;
  return (int16_t)pcm;
}

static void CaptureSamples(void* arg) {
  adc_init_continuous();

  while (true) {
    uint32_t out_bytes = 0;
    esp_err_t ret = adc_continuous_read(
        g_adc_handle, g_adc_read_buf, kAdcReadBytes, &out_bytes, pdMS_TO_TICKS(200));

    if (ret == ESP_OK && out_bytes > 0) {
      const size_t n_frames = out_bytes / sizeof(adc_digi_output_data_t);

      for (size_t i = 0; i < n_frames; i++) {
        const adc_digi_output_data_t* p =
            (const adc_digi_output_data_t*)(g_adc_read_buf +
                                            i * sizeof(adc_digi_output_data_t));

        // ESP32-C3 uses type2 layout (type1 will not compile)
        uint16_t raw = (uint16_t)(p->type2.data);

        g_pcm_buf[i] = adc12_to_pcm16(raw);
      }

      const int bytes_to_write = (int)(n_frames * sizeof(int16_t));
      const int bytes_written = rb_write(g_audio_capture_buffer,
                                         (uint8_t*)g_pcm_buf,
                                         bytes_to_write,
                                         pdMS_TO_TICKS(200));

      if (bytes_written > 0) {
        const int samples_written = bytes_written / (int)sizeof(int16_t);
        g_latest_audio_timestamp += (1000 * samples_written) / kAudioSampleFrequency;
      }
    }

    if (ret != ESP_OK && ret != ESP_ERR_TIMEOUT) {
      ESP_LOGE(TAG, "adc_continuous_read failed: %s", esp_err_to_name(ret));
      vTaskDelay(pdMS_TO_TICKS(50));
    }
  }
}

TfLiteStatus InitAudioRecording() {
  g_audio_capture_buffer = rb_init("tf_ringbuffer", kAudioCaptureBufferSize);
  if (!g_audio_capture_buffer) {
    ESP_LOGE(TAG, "Error creating ring buffer");
    return kTfLiteError;
  }

  xTaskCreate(CaptureSamples, "CaptureSamples", 1024 * 4, NULL, 10, NULL);

  while (!g_latest_audio_timestamp) {
    vTaskDelay(1);
  }

  ESP_LOGI(TAG, "Audio Recording started (ADC continuous)");
  return kTfLiteOk;
}

TfLiteStatus GetAudioSamples1(int* audio_samples_size, int16_t** audio_samples) {
  if (!g_is_audio_initialized) {
    TfLiteStatus init_status = InitAudioRecording();
    if (init_status != kTfLiteOk) {
      return init_status;
    }
    g_is_audio_initialized = true;
  }

  int bytes_read =
      rb_read(g_audio_capture_buffer, (uint8_t*)(g_audio_output_buffer), 16000, 1000);
  if (bytes_read < 0) {
    ESP_LOGI(TAG, "Couldn't read data in time");
    bytes_read = 0;
  }
  *audio_samples_size = bytes_read;
  *audio_samples = g_audio_output_buffer;
  return kTfLiteOk;
}

TfLiteStatus GetAudioSamples(int start_ms, int duration_ms,
                             int* audio_samples_size, int16_t** audio_samples) {
  if (!g_is_audio_initialized) {
    TfLiteStatus init_status = InitAudioRecording();
    if (init_status != kTfLiteOk) {
      return init_status;
    }
    g_is_audio_initialized = true;
  }

  memcpy((void*)(g_audio_output_buffer), (void*)(g_history_buffer),
         history_samples_to_keep * sizeof(int16_t));

  int bytes_read =
      rb_read(g_audio_capture_buffer,
              ((uint8_t*)(g_audio_output_buffer + history_samples_to_keep)),
              new_samples_to_get * sizeof(int16_t), pdMS_TO_TICKS(200));

  if (bytes_read < 0) {
    ESP_LOGE(TAG, "Model could not read data from Ring Buffer");
  }

  memcpy((void*)(g_history_buffer),
         (void*)(g_audio_output_buffer + new_samples_to_get),
         history_samples_to_keep * sizeof(int16_t));

  *audio_samples_size = kMaxAudioSampleSize;
  *audio_samples = g_audio_output_buffer;
  return kTfLiteOk;
}

int32_t LatestAudioTimestamp() { return g_latest_audio_timestamp; }

Issue: Missing header esp_adc/adc_continuous.h

After adding the include, the build failed with:

fatal error: esp_adc/adc_continuous.h: No such file or directory

Fix: Add the esp_adc component dependency

Edit main/CMakeLists.txt to include esp_adc to PRIV_REQUIRES (or REQUIRES):

nano ~/keyword_spotting_tflm/main/CMakeLists.txt
idf_component_register(
  SRCS ...
  INCLUDE_DIRS .
  PRIV_REQUIRES esp_adc
)

Issue: adc_digi_output_data_t had no type1 on ESP32-C3

Build error:

error: 'const struct adc_digi_output_data_t' has no member named 'type1'

Fix: Use the ESP32-C3 struct layout (TYPE2)

Make the following changes in the file keyword_spotting_tflm/main/audio_provider.cc:

  • ADC_DIGI_OUTPUT_FORMAT_TYPE1ADC_DIGI_OUTPUT_FORMAT_TYPE2
  • p->type1.datap->type2.data

Next, rebuild and reflash:

cd ~/keyword_spotting_tflm && idf.py build
cd ~/keyword_spotting_tflm && idf.py -p /dev/ttyUSB0 flash monitor

Issue: Toolchain version mismatch on ESP-IDF v6+

If the build fails with a toolchain mismatch (e.g., expected esp-15.2.0_20250929), install the ESP32-C3 toolchain:

python3 $IDF_PATH/tools/idf_tools.py install --targets esp32c3
. $HOME/esp/esp-idf/export.sh

Issue: idf.py fullclean refuses

If idf.py fullclean refuses to delete the build directory, delete it manually:

cd ~/keyword_spotting_tflm
rm -rf build
idf.py build

After switching the audio provider to ADC and aligning the ADC DMA output format for ESP32-C3, the application ran successfully and recognized the keywords “yes” and “no” over serial output. The next post will include customization for keyword spotting with additional words.

Wednesday, July 17, 2024

Ezurio Development Board Kit Giveaway

Ezurio (formerly Laird Connectivity) is offering a development kit giveaway that includes a System on Module (SOM), a carrier board, a wireless module, and an antenna. Ezurio specializes in SOMs featuring NXP i.MX processors, including the i.MX 8M Mini, 8M Plus, and i.MX 93, with support for both Android and Linux. The giveaway also includes Sona WiFi 6/6E and Bluetooth LE modules.


Tuesday, May 3, 2016

Tuesday, June 2, 2015

How to Avoid the DHCP delay if Ethernet is Disconnected in Debian Jessie

In Debian Jessie if the Ethernet port is not connected and the interface is set to automatically use dhcp at boot, the system will still wait for an IP address.  This adds about a minute to the boot time of a BeagleBone Black.  

Here is what you will see during the delay:
[   12.172221] IPv6: ADDRCONF(NETDEV_UP): eth0: link is not ready
[***   ] A start job is running for LSB: Raise network interf...26s / no limit)

To avoid the delay change the interfaces file to use something other than dhcp.  Here is a listing of the original file:
root@arm:~# cat /etc/network/interfaces
# interfaces(5) file used by ifup(8) and ifdown(8)
# Include files from /etc/network/interfaces.d:
source-directory /etc/network/interfaces.d

auto lo
iface lo inet loopback

auto eth0
iface eth0 inet dhcp

I just changed dhcp to manual, other options are auto and static.  Look at the man page for interfaces for more information on the other parameters.  

You can still connect Ethernet and use DHCP to get an IP address after the system boots with the dhclient command.

root@arm:~# dhclient eth0

I looked for the cause of this delay and found it mentioned in Debian Bug report logs - #754218

Am 01.12.2014 um 18:08 schrieb Christoph Anton Mitterer:
> On Mon, 2014-12-01 at 18:00 +0100, Michael Biebl wrote:
>> Very likely, yes. If you use DHCP, it can easily take a few seconds for
>> your network to be configured.
>> And now that /etc/init.d/networking both handles allow-hotplug and auto
>> interfaces and blocks for ifup to complete for those interfaces, the
>> delay during boot is kinda expected.
>
> So can we keep the other fix as it is? I mean this will just cause
> another stupid systemd-is-responsible-and-it-sucks hatred storm by
> people... :(

Not quite sure what you mean with "other fix"? Can you elaborate?

You can't eat a cake and have it too.
Either we wait blockingly (and wait actually means, well, delaying your
boot process and making it slower) for ifup to complete during boot as
workaround for broken software which doesn't deal with dynamic network
changes and requires $network, or we don't blockingly wait and cause
that other software to break.

For jessie we decided to take that boot delay hit in exchange for
supporting $network requiring software.

I believe a reasonable fix would be to detect that the port is not connected and skip or interrupt the wait for a DHCP response.  I admit I don’t know how much work that would be, or what else it would break.  Booting seems much faster with systemd otherwise.

Monday, May 18, 2015

BeagleBone Black Development Part 6 - Remote Application Debugging With Eclipse

This tutorial shows how to debug a BeagleBone Black  application remotely using the Eclipse IDE. This is similar to a post I made last year but with updates for BeagleBone Black Rev. C and Debian Jessie on the host machine and on the board.

This is part six in a series of tutorials that show how to develop for Beaglebone Black starting from a new install of Debian Jessie on a host machine in Part 1, and Part 2.  Part 3 covers cross-tool setup for BeagleBone BlackBeagleBone Black kernel build steps are in Part 4 and installing Linux to eMMC using Micro SD is covered in part 5.

6.1 Install GDB server on the BeagleBone Black


A GDB server can use any IP connection to debug.  You can use ethernet port (eth0), the USB device port (usb0), a USB to Ethernet adapter on the USB host port (eth1) or a USB to WIFI device.  


See the USB gadget section of Beaglebone Black - Linux on ARM to set up usb0.
https://eewiki.net/display/linuxonarm/BeagleBone+Black#BeagleBoneBlack-usbgadget


To use a USB-to-ethernet device in the host port, you need to build a kernel configured with drivers for your device.  The drivers can be found in menuconfig in Device drivers>Network device support>USB Network Adapters.


Connect the FTDI USB to serial port and log into the console and power up the Beaglebone Black.


The following commands with usernames that end with @arm are executed in the serial terminal program on the BeagleBone Black, not on the host used to cross-compile the kernel.


debian@arm:~$ sudo apt-get update
debian@arm:~$ sudo apt-get install gdbserver


6.2 Eclipse IDE Setup on Development Host


Eclipse is a large install package, it will take a little while to complete. Enter these commands on the Linux cross-development host machine.
user@debian:~$ sudo apt-get install eclipse eclipse-cdt  eclipse-cdt-launch-remote


Make a workspace for a test application.
user@debian:~$ mkdir ~/bbb/testws


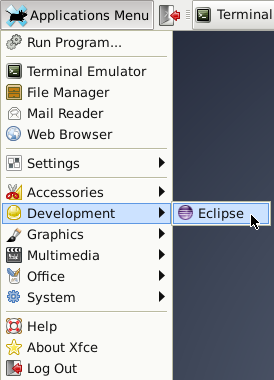
Start Eclipse from the Applications Menu.  Be patient, the first run takes a long time to load.


Browse to the workspace directory we created and click OK.


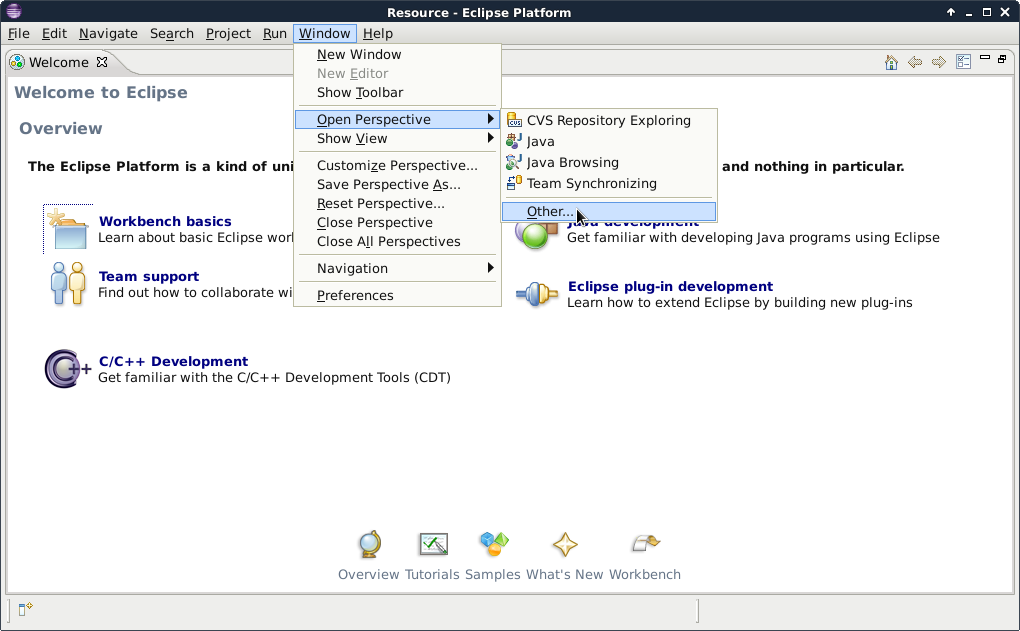
Eclipse will come up with a welcome screen.  Select Window, click Open Perspective, Other...
eclipse-open-perspective-other.png
open-c-cpp-perspective.png


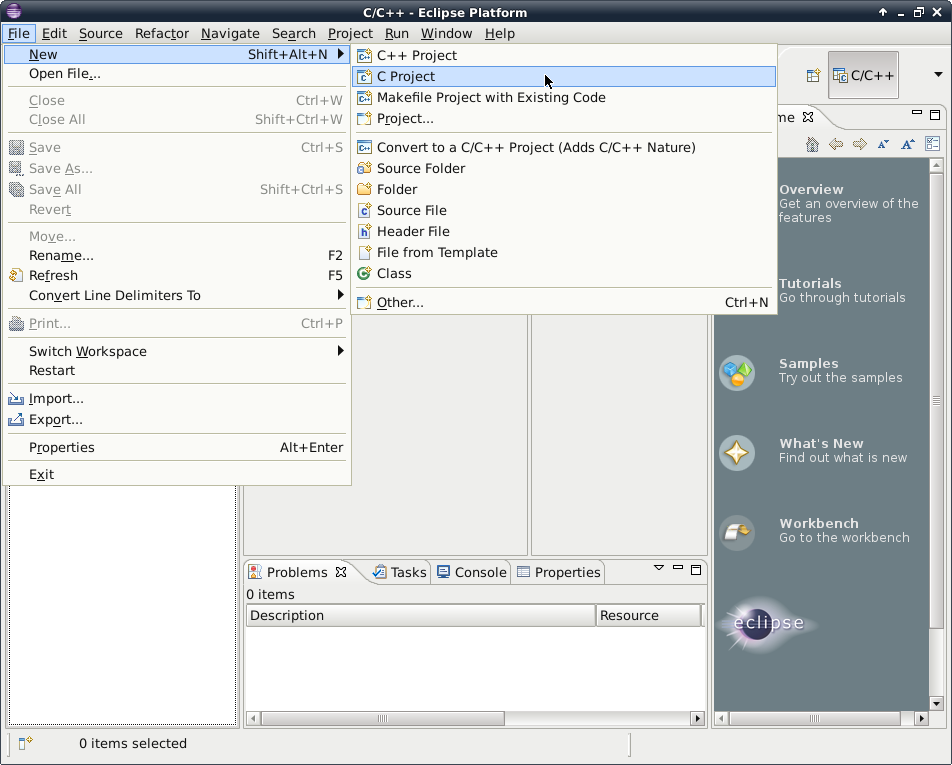
Create a new C project using File, New then selecting C Project.


Name the project, select project type Hello World ANSI C Project, select Toolchain Cross GCC, click next.


The next screen asks for basic properties, you can just enter an author and click next.


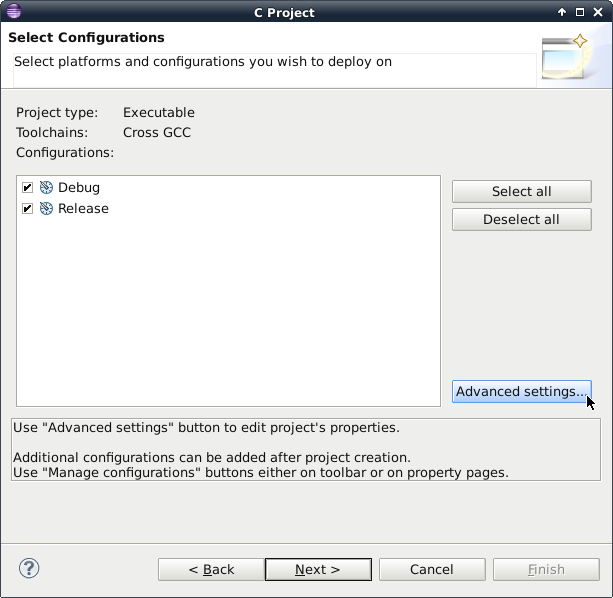
The Select Configurations window will appear, click on Advanced settings.


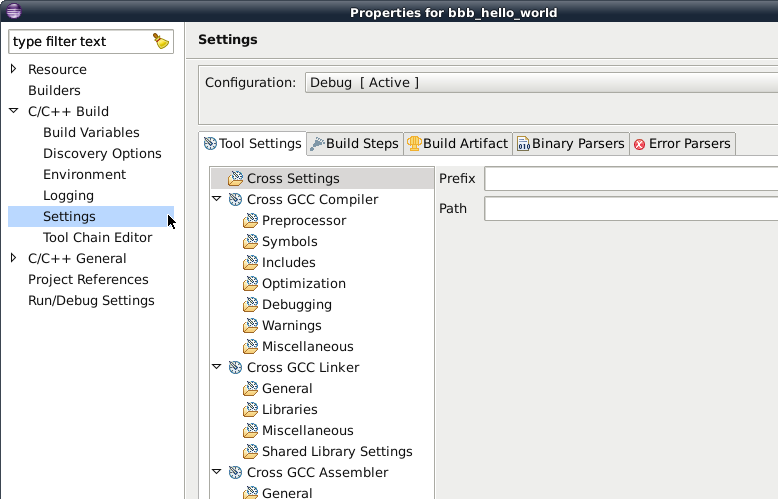
In the settings window on the left hand side open up C/C++ Build -> Settings to bring up the Tool Settings tab for the Debug configuration.


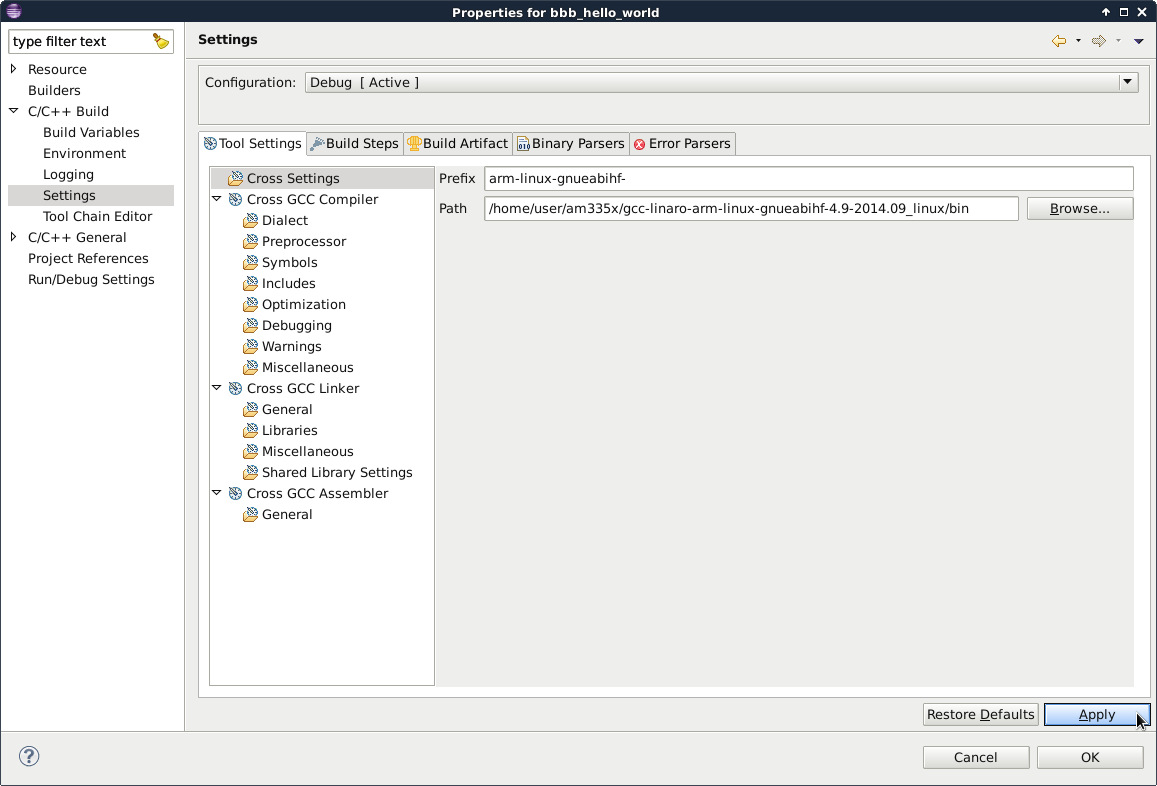
Select Cross Settings.  Set the prefix to arm-linux-gnueabihf-  and set the path of the tools we installed earlier (Section 3.2).  If you created the armcc-vars file in that section it will show the path.  
user@debian:~$ cat ~/am335x/armcc-vars
export CC=/home/user/am335x/gcc-linaro-arm-linux-gnueabihf-4.9-2014.09_linux/bin/arm-linux-gnueabihf-
export ARCH=arm
export CROSS_COMPILE=${CC}


In the example file above the prefix is arm-linux-gnueabihf- and the path to enter is:
/home/user/am335x/gcc-linaro-arm-linux-gnueabihf-4.9-2014.09_linux/bin


Properties for bbb_hello_world.png


Click Apply, then click OK.  You should go back to C Project screen, click Next.C Project Next.png


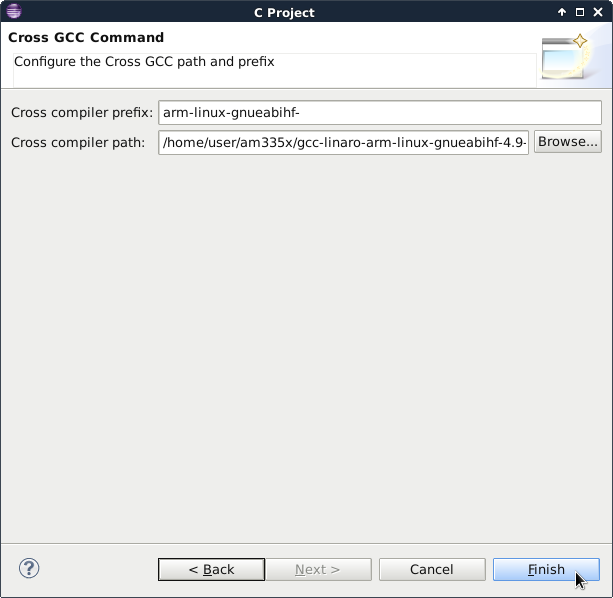
You should see the next screen asking for the same values we just entered (seems like a bug in eclipse).  Just enter the values for prefix and path one more time and click Finish.
C-project-cross-gcc-command.png


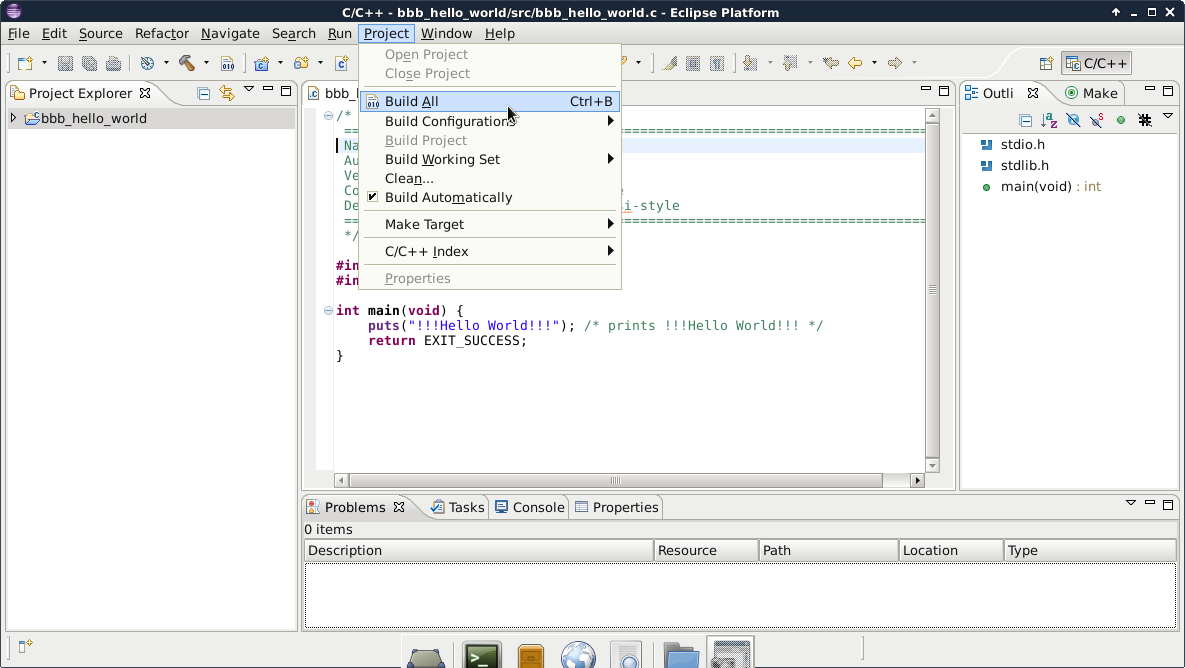
This brings up a workspace with the hello world C source file open.  Build the project using Project menu, Build All and you should see the prefix we entered being used for the tools (gcc).


eclipse-c-project-debug.png


You should not see any errors in the console tab at the bottom of the page.


6.3 Eclipse Remote Connection Setup


The eclipse remote connection will require some changes on the BeagleBone Black.  Make a serial port connection or ssh into a console.


First check the IP address of the port we will use for debugging.  Use the ifconfig command and write down the inet addr shown.  Ethernet port (eth0) information shown below.
debian@arm:~$ sudo ifconfig
[sudo] password for debian:
eth0      Link encap:Ethernet  HWaddr 1c:ba:8c:e1:7f:ae  
         inet addr:192.168.1.140  Bcast:192.168.1.255  Mask:255.255.255.0
         inet6 addr: fe80::1eba:8cff:fee1:7fae/64 Scope:Link
         UP BROADCAST RUNNING MULTICAST  MTU:1500  Metric:1
         RX packets:22706 errors:0 dropped:0 overruns:0 frame:0
         TX packets:205 errors:0 dropped:0 overruns:0 carrier:0
         collisions:0 txqueuelen:1000
         RX bytes:1790146 (1.7 MiB)  TX bytes:23064 (22.5 KiB)
         Interrupt:40


We will need ssh installed and running on the BeagleBone Black for eclipse remote debugging.


Test ssh from the development host machine using the IP address we just found for the port..
user@debian:~$ ssh debian@192.168.1.140


If there are any problems check to make sure an ssh server is installed.
debian@arm:~$ dpkg -s openssh-server
If not install openssh server.
debian@arm:~$ sudo apt-get install openssh-server


If ssh is installed but you have trouble connecting to the board some host key files might be missing.
Check for ‘Could not load host key’ errors in /var/log/auth.log using grep.
debian@arm:~$ grep sshd /var/log/auth.log


If you see this problem you can regenerate the individual keys or just regenerate all by reconfiguring openssh server.
To reconfigure, first delete any existing host keys.
debian@arm:~$ sudo rm /etc/ssh/ssh_host_*
Next, generate all new key files.
debian@arm:~$ dpkg-reconfigure openssh-server


If for some reason you need to regenerate individual keys see Phillip’s Tech Blog: Could not load host key.


Once ssh is working from the host the next step is to add another user to the BeagleBone for the remote debug connection.


Create a user with the same name as the user you created for Debian on the host virtual machine.  In this document the name is just ‘user’ for simplicity.  To be clear, if you are logged in and running eclipse as a user ‘joe’ in the host debian virtual machine, you will create a new user named ‘joe’ on the BeagleBone Black to log in with eclipse ssh for debugging.  This might not be absolutely necessary, but I haven’t found the place to change the remote username, it seems eclipse expects the remote system to have the same username (but allows you to change the remote password).
debian@arm:~$ sudo adduser user
[sudo] password for debian:
Adding user `user' ...
Adding new group `user' (1001) ...
Adding new user `user' (1001) with group `user' ...
Creating home directory `/home/user' ...
Copying files from `/etc/skel' ...
Enter new UNIX password:
Retype new UNIX password:
passwd: password updated successfully
Changing the user information for user
Enter the new value, or press ENTER for the default
       Full Name []:
       Room Number []:
       Work Phone []:
       Home Phone []:
       Other []:
Is the information correct? [Y/n] Y
Adding new user `user' to extra groups ...
Adding user `user' to group `dialout' ...
Adding user `user' to group `i2c' ...
Adding user `user' to group `spi' ...
Adding user `user' to group `cdrom' ...
Adding user `user' to group `floppy' ...
Adding user `user' to group `audio' ...
Adding user `user' to group `video' ...
Adding user `user' to group `plugdev' ...
Adding user `user' to group `users' …
debian@arm:~$ exit
logout


Debian GNU/Linux 7 arm ttyO0


default username:password is [debian:temppwd]


arm login: user
Password:
Linux arm 3.8.13-bone70.5 #1 SMP Wed Mar 11 16:37:28 EDT 2015 armv7l


The programs included with the Debian GNU/Linux system are free software;
the exact distribution terms for each program are described in the
individual files in /usr/share/doc/*/copyright.


Debian GNU/Linux comes with ABSOLUTELY NO WARRANTY, to the extent
permitted by applicable law.
user@arm:~$


Create a workspace and project directory.
user@arm:~$ mkdir ~/remotews                                                  
user@arm:~$ mkdir ~/remotews/hello                                            
user@arm:~$ chmod a+w ~/remotews/hello/
                       
Next we will set up the host using eclipse.  
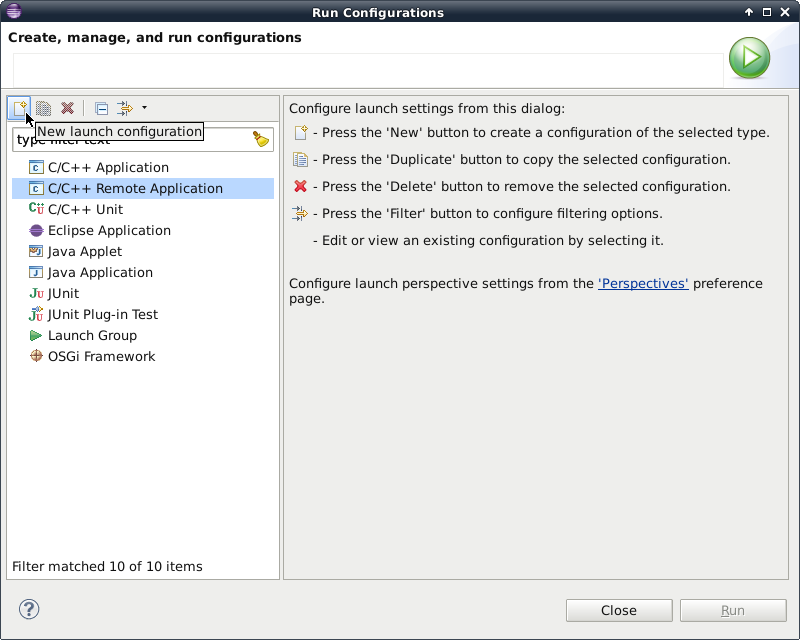
On the Eclipse Run menu, click Run Configurations. Select C/C++ Remote Application, press the New launch configuration button.


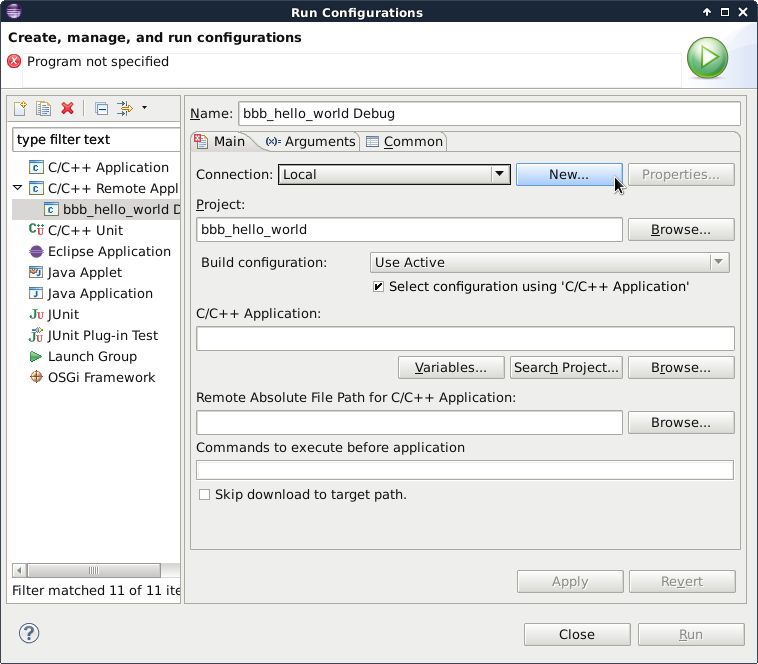
On the next window the bbb_hello_world Debug run configuration is selected.  On the main tab click New.


run configurations connection new.png


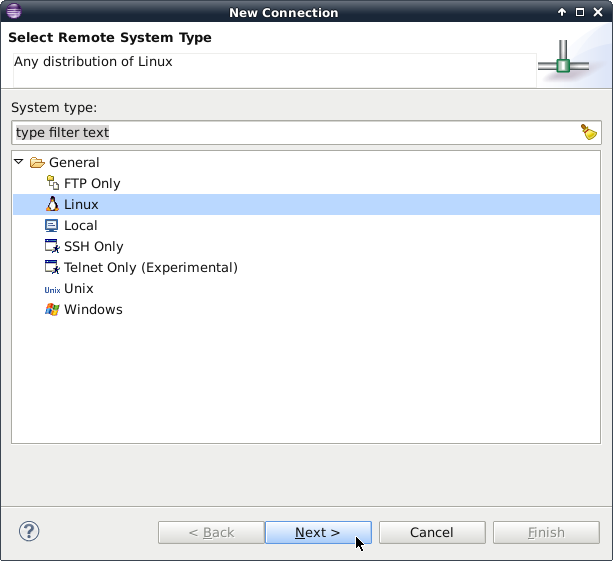
In the New connection window for system type click Linux then next.  


In the next window we will enter the BeagleBone Black IP address for the host name and give a connection name and description.  


Enter the internet address of the port as the Host name.  Click the Verify host name box so it is not checked.


new connection description.png


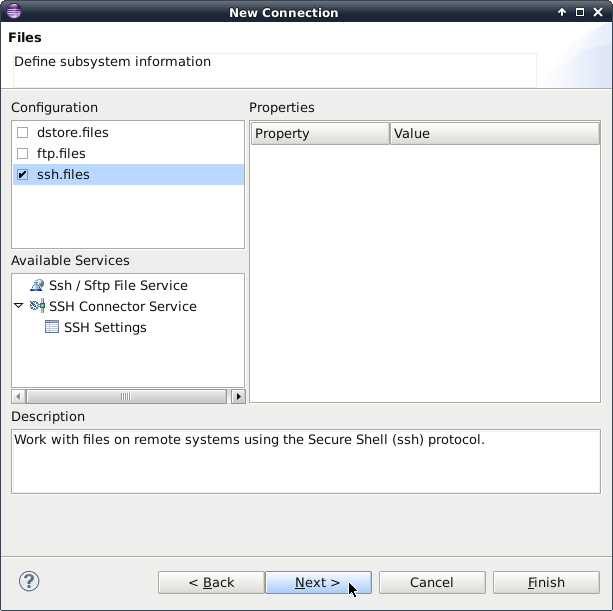
In the next screen check the box for ssh.files and click Next.


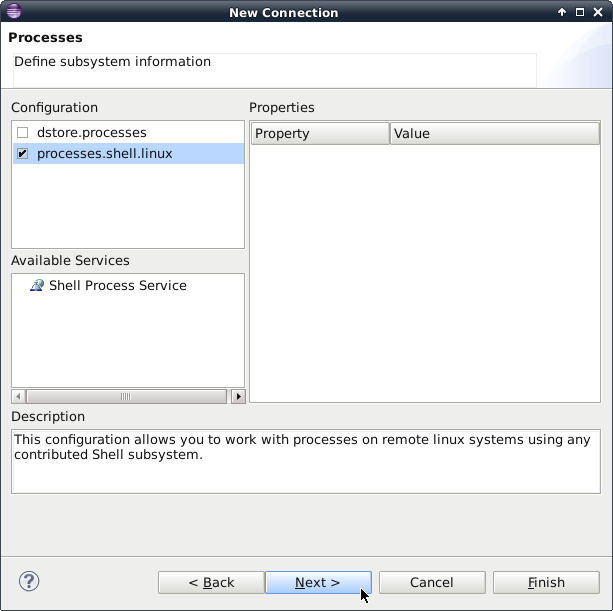
In the Next window click the box for processes.shell.linux and click Next.


On the next screen click ssh.shells and Next.


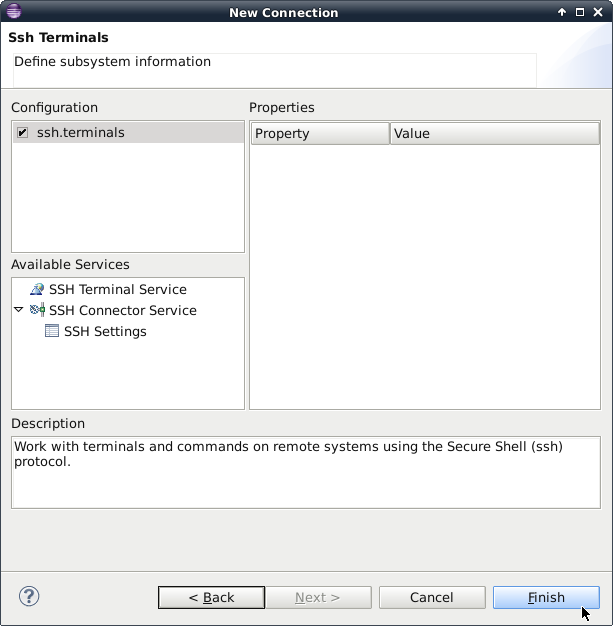
The next window select ssh.terminals (should be default) and click Finish.


This will return you to the Run Configurations window.
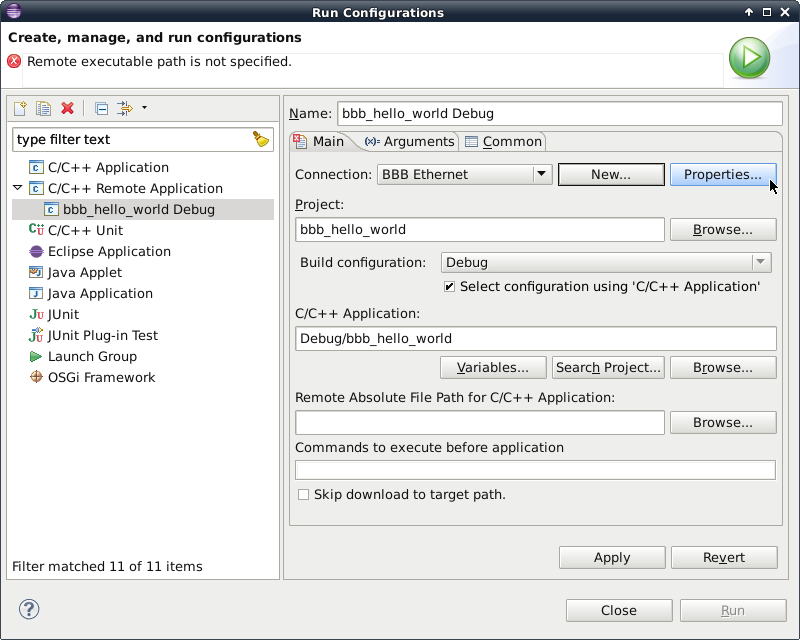
In the Main tab, select BBB Ethernet for Connection then click Properties to the right.


Enter the path to the remote workspace and click OK.  


Next in the Main tab, enter the remote absolute path to the executable application binary.  The absolute path of the executable file will be /home/user/remotews/hello/bbb_hello_world.


Enter ‘chmod +x /home/user/remotews/hello/bbb_hello_world’  in the field ‘commands to execute before application’ to allow the executable to run after it is uploaded to the board.


After both values have been entered click Apply then click Run.  If Run is greyed out so you can’t continue then I have found it easiest to just delete the bbb_hello_world Debug configuration and back up a few steps to creating a new launch configuration.  You won’t have to re-enter the connection information but you need to enter the remote absolute file path and commands to execute again.
Click Run.  Wait a few seconds for the Enter Password window to appear.  Enter the username and password for the BeagleBone Black and click OK.


A secure storage window will appear, choose a password, this is an eclipse feature not required for the ssh connection.


Even though we entered save password above, a ‘Password required’ window might  appear for your ssh connection (possibly only the first time).  Enter the ssh username and password again to connect to the beaglebone black.


If an authenticity of host key warning appears, click Yes.


After a successful run the console will be displayed in the lower Eclipse window.  It will show the output of the remote program.
echo $PWD'>'
chmod +x /home/user/remotews/hello/bbb_hello_world;/home/user/remotews/hello/bbb_hello_world;exit
Last login: Thu Mar 26 15:43:10 2015 from earth
user@arm:~$ echo $PWD'>'
/home/user>
user@arm:~$ chmod +x /home/user/remotews/hello/bbb_hello_world;/home/user/remote ws/hello/bbb_hello_world;exit
!!!Hello World!!!
logout


6.4 Eclipse GDB Debugging Setup


Open a terminal on the host Linux system.  Change to the Debug directory for the project and create an empty .gdbinit file.
user@debian:~$ cd ~/bbb/testws/bbb_hello_world/Debug/
user@debian:~/bbb/testws/bbb_hello_world/Debug$ touch .gdbinit


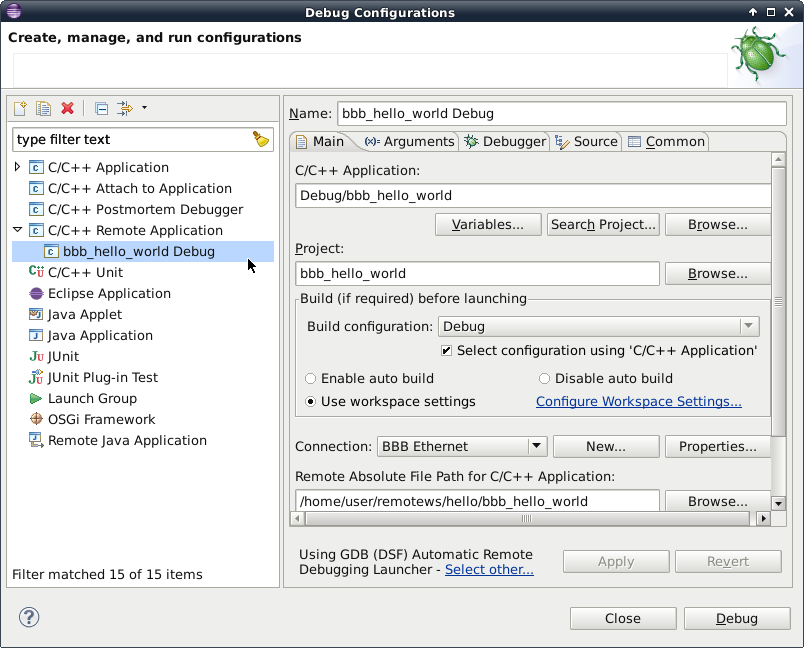
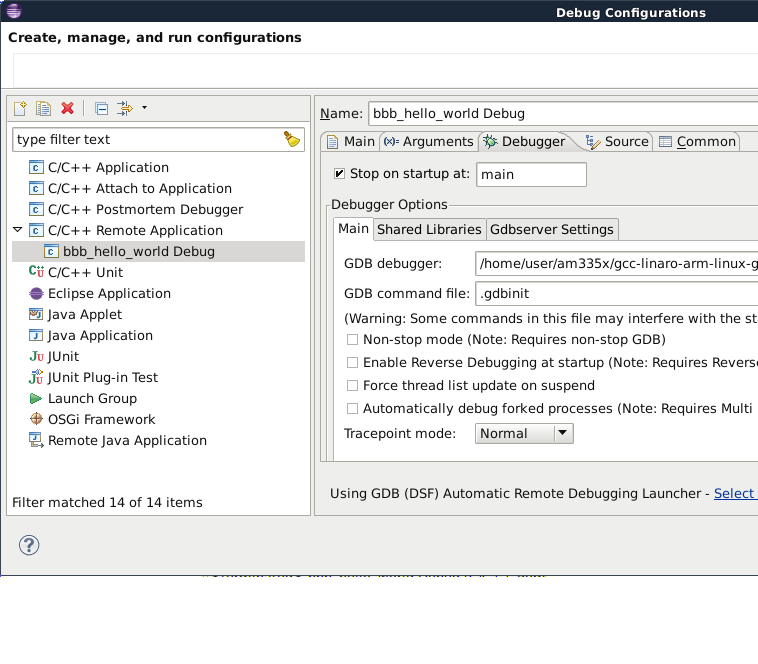
Open Eclipse, open the Run menu in the menu bar and click Debug Configurations. Select bbb_hello_world Debug under C/C++ Remote Application.


Open the Debugger tab.  This has three tabs for Debugger Options, click the Main tab.
debug configuration main tab.png


Click the Browse button for GDB debugger to find the gdb executable from the host toolchain (arm-linux-gnueabihf-gdb).  
debug browse gdb.png
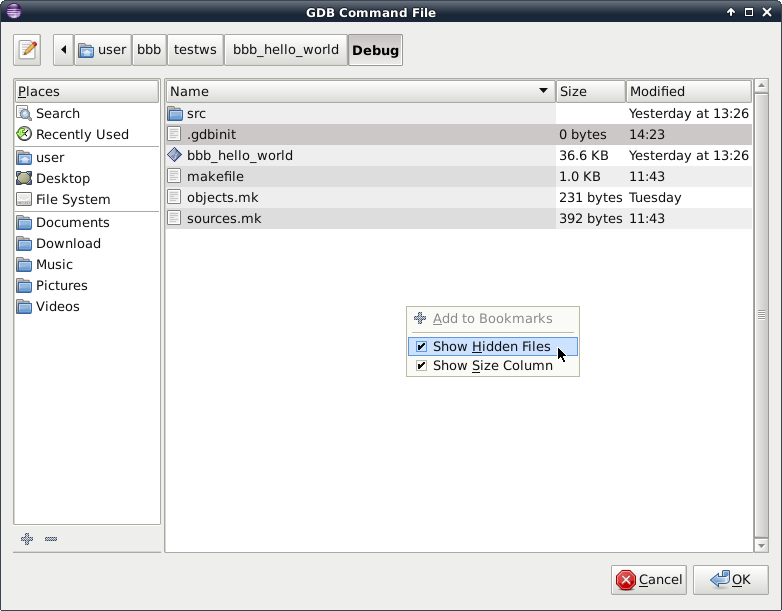
Next click the browse button next to GDB Command file, to locate it you will need to Right-click to show hidden files to see it.  After you find it select it and click OK.


After entering the debugger and command file click Apply.
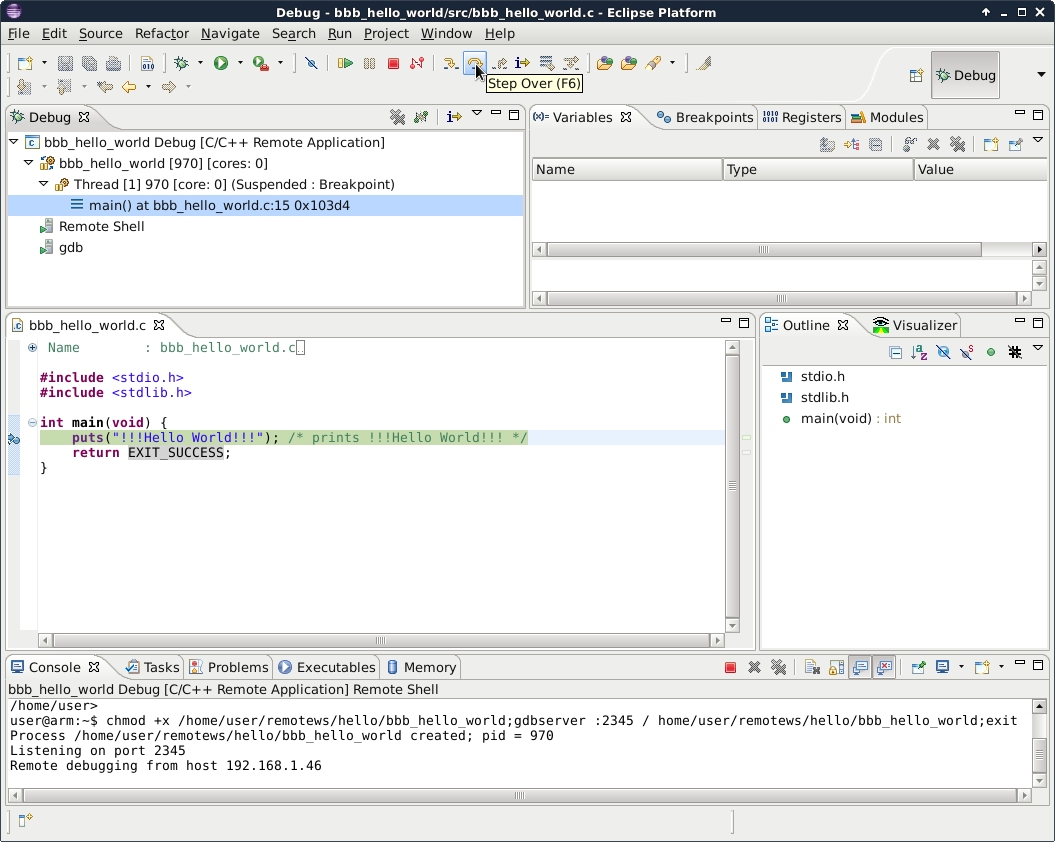
Now click Debug in the lower right hand corner of the Debug Configurations window to test the setup.  The first time you will get a confirmation window.


The Debugger will stop before the first line of the program.   Mouse over the icons to get descriptions of the debugger commands or use the Run menu.  See the Eclipse Help menu for more information on the Debug commands.
Debug-bbb_hello_world.png


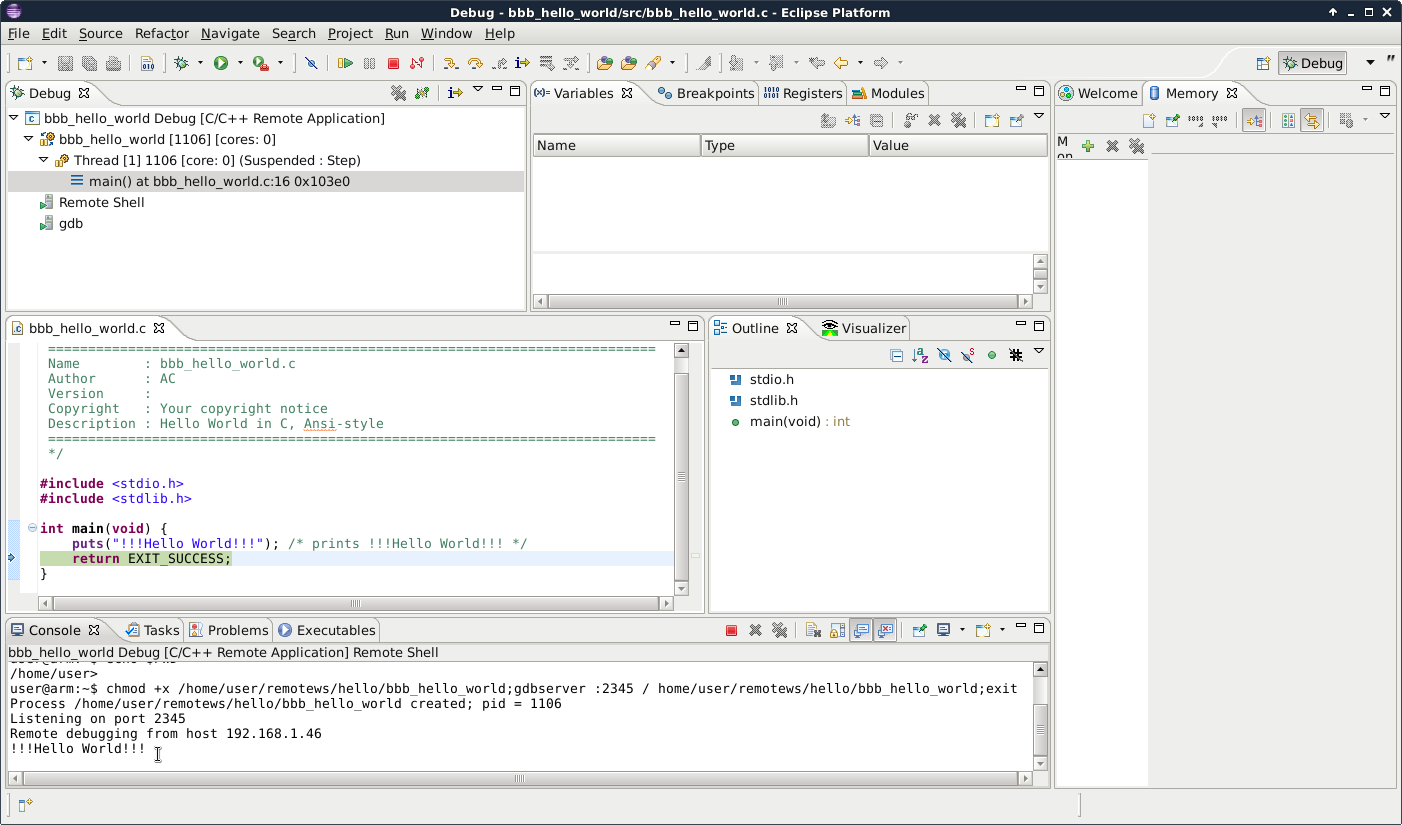
F6 will step over so you can see the !!!Hello World!!! output in the Console window.
Debug hello world success.png


If this works you are finished setting up eclipse.  You should be able to debug your own programs using this setup as a guide.