NVIDIA Cosmos is a new platform from NVIDIA that uses generative AI for digital worldbuilding. In this post, I will demonstrate some possible outputs from Cosmos using NVIDIA's simulation tools. Afterward, I will discuss some of the functions and libraries Cosmos uses.
Once we've selected cosmos-1.0-diffusion-7b, we are presented with an option to input text, an image, or a video. The default example is a robot rolling through a chemical plant, with a video as the output.
AN AI-Generated Image of a Robot Traversing a Chemical Plant
For this demonstration, I'm going to begin by inputting the following text into the input box: "A crane at a dock lifting a large cargo crate from a ship onto the dock. photorealistic" After about 60 seconds, Cosmos produces a short 5-second video as output. Here is a frame from the one it generated from my first prompt:
An AI-Generated Image of a Dock with a Crane
In this case, we used the Cosmos-1.0-diffusion-7b-Text2World model, which takes an input of up 300 words and produces an output video of 121 frames.As described in the linked documentation, it uses self-attention, cross-attention, and feedforward layers. Additionally, it uses adaptive layer normalization for denoising between each layer. Each layer is necessary and serves a unique purpose.
Starting with the self-attention layer, it is used to determine what words in the input text will be most relevant to the output image. For example, the word "crane" in our prompt is weighted higher than the word "at". While both are relevant to the output, the object of the crane is in the center of the video. Next, the cross-attention layer relates the information contained in each word and assigns it to a relevant image as a result. In our case, this is shown by the word crate and the image of a brown crate. To clarify, the word "crate" is referred to as the source, and the image is referred to as the target.
The third layer, the feedforward layer, redefines each word after the the cross-attention layer finds it relevance. For example, the crate in our example is placed on the dock in our image, because the feedforward layer related it to the phrase "onto the dock". Lastly, the adaptive layer normalization stabilizes the output, which in this case could refer to making the crane move slowly and not too jittery.
The Preview Image for cosmos-1.0-autoregressive-5b
This model takes a picture as input and produces a 5-second video as an output. The first frame of the output video is the exact picture, and the model predicts what happens in the next 5 seconds of the scene to create the video. For this model, there are a series of 9 preselected images to choose from.
Sample Images for Video Generation
Similar to the text2world model, the autoregressive video2world model employs self-attention, cross-attention, and feedforward layers. It should be noted that while this model is referred to as video2world, it can accept text, images, or videos as input, and outputs a video from whichever input was given.
Overall, NVIDIA Cosmos is a powerful worldbuilding tool for a variety of applications including simulation software as well as game development. To learn more about the development tools NVIDIA has to offer, check out the following post: An Overview of NVIDIA's AI Tools for Developers
NVIDIA recently unveiled their new Jetson Orin Nano Super Developer Kit, a powerful computer designed for using AI on edge devices. Key features of the kit include a performance of up to 67 TOPS(Trillion Operations per Second), 102 GB/s of memory bandwidth, and a CPU frequency of up to 1.7 GHz. Other technical specifications found on the datasheet are a 6-core ARM Cortex-A78AE v8.2 64-bit CPU (arm-cortex-a78ae-product-brief), an NVIDIA Ampere GPU (NVIDIA Ampere Architecture) and 8GB of memory. The kit has a cost of $249 and sold out quickly. It is currently on backorder from retailers such as Sparkfun Electronics, and Seeed Studio.
This new Super Developer Kit is an upgraded version of the previous Jetson Orin Nano Developer Kit. NVIDIA has provided the JetPack 6.1 SDK which can be used on existing Jetson Orin Nano Developer Kits to access features from the Super developer Kit. To unlock the super performance, users can select the latest release of JetPack, Jetpack 6.1 (rev. 1), when installing the latest SD Card image for the Kit. Detailed installation instructions can be found on the following page: JetPack SDK.
The following table from NVIDIA highlights the main improvements of the Super Developer Kit, including the improved operating speed of up to 67 TOPS and memory bandwidth of 102 GB/s.
In this video, NVIDIA CEO Jensen Huang presents the Jetson Orin Nano Super Developer Kit.
If you are interested in learning about software compatible with the Jetson Orin Nano, check out this post in which I summarize the key features of NVIDIA's AI tools: An Overview of NVIDIA's AI Tools For Developers
Here is a quick overview of the tools NVIDIA offers for Developers! All of these tools are available through the NVIDIA Developer platform, and joining is free. NVIDIA also offers the Jetson Orin Nano Super Developer kit which I review in the post: NVIDIA's Jetson Orin Nano Super Developer Kit
Generative AI Solutions - NVIDIA's Generative AI Solutions offer a comprehensive set of tools for developers. A great starting point is the Full-Stack Generative AI Platform for Developers. This platform provides an overview of NVIDIA's software. hardware, and services for building with Generative AI. Its "full-stack" approach enables developers to complete entire builds using NVIDIA products.
Full-Stack Overview
NVIDIA Documentation Hub - a centralized resource for accessing technical documentation for all NVIDIA products and services.
RAPIDS Suite - contains AI Libraries that improve the performance of other open-source tools. It includes support for libraries such as Apache Spark, PyData, Dask, Python, and C++.
Full-Stack Using RAPIDS Libraries
Riva Speech AI SDK - a collection of software development kits (SDKs) useful for speech-related tasks. It offers starter guides for key use cases, including Text-To-Speech, Automatic Speech Recognition, and Neural Machine Translation. A tutorial for getting started with RIVA can be found in the video below.
DeepStream SDK - a tool useful for vision-based AI applications. It supports tasks such as video encoding, decoding, and rendering, enabling real-time video analysis.
DeepStream SDK
NVIDIA Developer Forums - an excellent resource for developers to ask questions and find answers to technical issues related to NVIDIA's AI tools.
Developer Forums
In conclusion, NVIDIA offers an extensive library of tools for a wide range of AI applications. Many of these tools can be accessed for free through the NVIDIA developer program, making it a valuable resource for developers at any level.
Pololu is offering discounts (up to 50% off!) on many electronic components including Robot Chassis, motors, sensors, and much, much more! Check out the link for all details and a categorized list of all products on sale: Pololu Black Friday Sale 2024.
Raspberry Pi While not a Black Friday deal, the Raspberry Pi Compute Module is now available for $45 from the Raspberry Pi Store. It is a modular version of the Raspberry Pi 5.
STMicroelectronics has plenty of Edge AI Tools that are useful in a variety of applications. They collectively form the ST Edge AI Suite - STMicroelectronics. All of these tools can be used free of charge with a myST user account. To create an account, click on the avatar in the top right corner of the STMicroelectronics Website. You are now ready to access the ST Edge AI Suite!
The first tool is NanoEdge AI Studio, it is a good place to get started with Machine Learning.
It is also compatible with Arduino Devices.
For getting started, the following video is a good example - Anomaly Detection Demo Using Edge AI. It uses the Accelerometer on the STEVAL-STWINKT1B board. In a future blog post I will try this demo using some other ST Micro boards that have an accelerometer. Additionally, the Nano Edge AI libraries can be used with any type of sensor.
To use the Datalogger Feature in NanoEdge AI Studio, a Nucleo-F411RE, ST-EVAL or similar type of board is necessary. Here are all the Board options shown:
ST Edge AI Developer Cloud is a tool that allows users to do on remotely stored devices. You can import your own ML model or choose from ST Edge AI Model Zoo for optimization and testing.
The following video is a getting started guide for STM32Cube.AI Developer Cloud, the predecessor of ST Edge AI Developer Cloud. While there are some differences between the two, this getting started video does have some helpful steps. I'm also working on a blog post about getting started with the updated ST Edge AI Developer Cloud.
STEdgeAI-Core is used for compiling edge AI models on various ST MCUs MPUs, and Smart Sensors - all in one tool. The following video gives an overview.
The AI expansion pack for STM32CubeMX is a tool used for optimizing and profiling Neural Networks and Machine Learning models for STM32. To install this tool, open the STM32CubeIDE, and go to Help > Manage Embedded Software Packages > STMicroelectronics, then scroll down to X-CUBE-AI and click on the newest available version (9.1.0 in this case), then click "Install." You may need to log-in on the pop up that appears for the expansion to install successfully. Here is a screenshot of the installation screen.
One of the newer tools in the suite, ST High Speed Datalog is a data acquisition and visualization toolkit. It is specifically designed for applications in embedded systems and data science. The following Datalog Quick Start Guide is designed to get started with the Datalog along with the STEVAL-STWINBX1 .
The final tool, ST ToF Hand Posture, is used for detecting hand gestures on STM32 MCUs using a Time-of-Flight sensor. It requires a free login to MyST to access.
In this part, we will use the words "On" and "Off" to control the LED and turn it on and off.
This is a continuation from the steps in
Part 1.
To do this, we can use the Google Commands dataset which has data for many short words. The following
video by Digi-Key includes instructions for Downloading the dataset. Although it is not labeled as
machine learning in the title, it is similar to what is being done in this ML guide.
2.1 Downloading Python Script
The Dataset Curation Python Script
is available to download. Here are the steps to extract it properly, as the video instructions are
shown too quickly.
2.1.1 Install 7-Zip
For extracting the file. On the
7-Zip Download Page
select the download for your machine. (I'm using Windows 7 64-Bit)
Once downloaded, open the .exe file. (You may need to click "Allow Changes" in the pop-up window)
Next, Install.
2.1.2
Click on the green "Code" box and select the "Download ZIP" option that appears
2.1.3
Left Click on the Downloaded zip file, then click on "Show more options".
2.1.4
Under "Show more options" Hover over "7-zip", then click on "Extract Here"
2.1.5
Once it's extracted, open File Explorer and search for "ei-keyword". Open the "ei-keyword-spotting-master" folder.
2.1.6
Copy and paste the "dataset-curation" and "utils" Python files into a directory where they can be accessed.
2.2 Downloading Speech Commands
As shown in the video description, here is a download link for the
Google Speech Commands Dataset.
If a page appears when following this link, click on "Go to Site" to start the download.
2.2.1
Left Click on the Downloaded zip file of the Dataset, then click on "Extract All"
2.2.2
Create a folder for housing the necessary files. In this example I named it "Speech_Rec".
2.2.3
Cut and paste the _background_noise_ into the created folder. The _background_noise_ must be stored
separately from the individual keywords.
2.2.4
Create a folder for housing keywords such as "on" and "off". (The video example includes using custom keywords as well)
2.2.5
Copy and paste the "on" and "off" keywords into the newly created "keywords" folder
2.3 Using the Program
2.3.1
Python will need to be installed to run the speech Recognition Code.
Download Python
— click on the yellow box to download the latest version.
2.3.2
If you already have Python installed, it may ask to upgrade to the latest version.
Otherwise, there should be an option to install.
2.3.3
An option to close the installer will appear once setup is successful
2.3.4
Open Windows PowerShell (Terminal) and run the following command. This installs all the necessary Python libraries for the speech recognition.
PowerShell — install Python libraries
pip install librosa numpy soundfile
2.3.5
While in PowerShell, go to the folder that contains all the speech recognition files ("Speech_Rec").
To find the path, click on the folder name in File Explorer, then left click and select "Copy Address".
Use the cd command followed by the path to the directory, for example:
PowerShell — navigate to Speech_Rec folder
cd C:\Users\maxcl\Downloads\Speech_Rec
2.3.6
Next, enter the following line into the terminal. It runs the dataset-curation.py script and sets all the necessary parameters.
Once it's finished, a set of folders named after the input, output, and keywords can be found in the
directory. (Note: In this case, the folder name "Speech_Rec" appeared twice so I changed the second
one to "results")
2.3.8
Open the "on" folder and select one of the audio samples to play.
2.4 Edge Impulse
2.4.1
Next, we will go to Edge Impulse. Click on the "Login" option
in the top left corner of the home screen, as this will give you the option to either log into your
account or create a new account.
2.4.2
Once you've created an account and/or logged in, click on the icon in the top left, then click on "Projects"
2.4.3
Click on "Create New Project"
2.4.4
Name your project then click on the green "Create New Project". I chose to leave this one as public.
2.4.5
In the new project, click on "Data Acquisition"
2.4.6
Next, click on "Add Data"
2.4.7
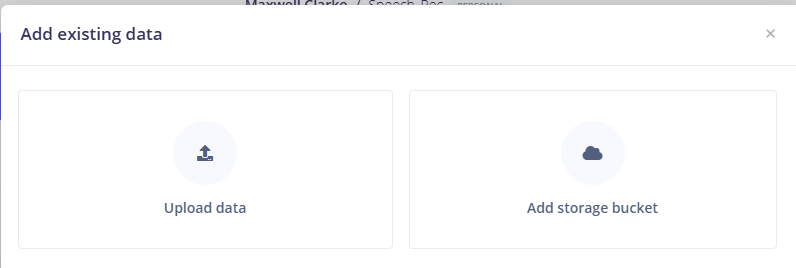
Select "Upload Data"
2.4.8
Leave the default selections for category and label, and click on "Select Files"
2.4.9
Start by uploading all the files in the noise folder. (I selected all by clicking on the box next to "name"). Click "Open"
2.4.10
Afterwards, click on the purple "Upload Data" button
Edge Impulse will then process and add the files to the project.
2.4.11
Repeat steps 2.4.8 through 2.4.10 for the "on", "off", and "unknown" categories.
2.4.12
The pie charts at the top of the Dashboard should show that the data is split amongst the four
categories, and 80% of the data was assigned to training and 20% was assigned to testing.
2.4.13
On the left side, click on Impulse Design, then Create Impulse. Click on "Add Processing Block".
2.4.14
Add the Audio (MFCC) Processing Block
2.4.15
Select the "Add a Learning Block" option, then choose the default "Classification" block
2.4.16
Click on the Green "Save Impulse"
2.4.17
From the MFCC on the left, select the Generate Features tab, then click on "Generate Features"
2.4.18
Next, under Classifier on the left, choose Save & Train.
2.4.19
Now that the model is trained, the loss and accuracy of the model will appear. The accuracy refers to
the percentage of the data that was correctly classified. As for loss, it is based upon a predefined
function, and a smaller loss value indicates better ML model accuracy.
2.4.20
To test the model, go to Model Testing on the left. Select "Classify All".
2.4.21
Once the testing is done, the results will be shown.
2.4.22
Next, we will deploy the model for Arduino. Click on the Search Bar and select the Arduino option.
(Note: There are other options that can be used for other microcontrollers such as STM32 devices)
2.4.23
Select "Build" to create the Arduino Library, which will download automatically.
Once it's done building, a dialogue will pop up showing the path for using the Arduino Library
2.5 Arduino
2.5.1
In the Arduino IDE, open a new Arduino Sketch (File > New Sketch)
2.5.2
Once you're in a new sketch, select Sketch > Include Library > Add .ZIP Library and open the
library downloaded from Edge Impulse.
2.5.3
Next, go to File > Examples and scroll down to find the library you just installed. It should have
the same name as the project in Edge Impulse. Go to "Speech_Rec_inferencing" (may differ based on your
project name) > "nano_ble33_sense" > "nano_ble33_sense_microphone_continuous".
Note: the Arduino IDE might need to be restarted for it to appear.
2.5.4
Open File Explorer and go to the newly installed Speech_Rec library and locate the Model variables file.
The path will likely be:
User > Arduino > libraries > Speech_Rec_Inferencing > src > model_parameters > model_variables
2.5.5
Open the model_variables.h file in a code editor such as VS Code, and search for where the keywords
are listed. The line will likely be:
In this case "_noise" is in position 0, "_unknown" is in 1, "off" is 2, and "on" is 3.
2.5.6
Return to the Arduino IDE. In the nano_ble33_sense_continuous example, create a new line under line 59
(static int print_results = -(EI_CLASSIFIER_SLICES_PER_MODEL_WINDOW);).
The new line will read:
Arduino sketch — declare LED pin variable
static const int led_pin = LED_BUILTIN;
2.5.7
Next, go a few lines down to be within the void setup() { block of code.
Type the following line:
Arduino sketch — set LED pin as output (inside void setup)
pinMode(led_pin, OUTPUT);
2.5.8
Even further down in the code, above line 114
(if (++print_results >= (EI_CLASSIFIER_SLICES_PER_MODEL_WINDOW)) {),
enter the following block of code:
Arduino sketch — LED on/off control block
    //turn on LED if "On" value is above a threshold
    if (result.classification[3].value > 0.7) {
      digitalWrite(led_pin, HIGH);
    }
    //turn off LED if "Off" value is above a threshold
    else if (result.classification[2].value > 0.7) {
      digitalWrite(led_pin, LOW);
    }
    else {
      digitalWrite(led_pin, LOW);
    }
This code controls whether the LED is "on" or "off" based on the keyword recognized. The
result.classification[2] and result.classification[3] values are consistent
with the labels for "Off" and "On" found in the model_variables.h file.
2.5.9
Next, click the arrow to upload the code. It may take a while to compile, as it is a lengthy code segment.
2.5.10
Once the code is compiled, speak the keywords within a couple inches of the board. The voice needs to
be very close for the recognition to work. If the board recognizes a word with a confidence value of
0.7, the LED next to the USB will turn yellow.
2.5.11
To check the readings for the speech recognition values on the board, you can look at the serial
monitor in the Arduino IDE. To do this click on Tools > Serial Monitor (or type
Ctrl + Shift + M). The serial monitor continually shows the speech rec values for all the
keywords, as we are in the continuous example.
We now have a working Arduino program that uses machine learning to recognize the words "on" and "off".
In the future, the code can be adjusted so that the LED stays on for longer, thus making the "off"
command more effective.