Monday, August 26, 2024

Introduction to Machine Learning on Arduino - Micro Speech - Part 2


Part 2: Changing Words

In this part, we will use the words ""On" and "Off" to control the LED and turn it on and off.

To do this, we can use the Google Commands dataset which has data for many short words. The following video by Digi-Key includes instructions for Downloading the dataset. Although it is not labeled as machine learning in the title, it is similar to what is being done in this ML guide.


2.1 Downloading Python Script

The Dataset Curation Python Script is available to download. Here are the steps to extract it properly, as the video instructions are shown too quickly.

2.1.1 Install 7-Zip

For extracting the file
On the 7-Zip Download Page Select the download for your machine. (I'm using Windows 7 64-Bit)
Once downloaded, open the .exe file. (You may need to click "Allow Changes" in the pop-up window) Next, Install.


2.1.2

Click on the green "Code" box and select the "Download ZIP" option that appears

2.1.3


Left Click on the Downloaded zip file, then click on "Show more options".

2.1.4


Under "Show more options" Hover over "7-zip", then click on "Extract Here"

2.1.5

Once it's extracted, open File Explorer and search for "ei-keyword". Open the "ei-keyword-spotting-master" folder.

2.1.6


Copy and paste the "dataset-curation" and "utils" Python files into a directory where they can be accessed.

2.2 Downloading Speech Commands

As shown in the video description, here is a download link for the Google Speech Commands Dataset.  If a page appears when following this link, click on "Go to Site" to start the download.

2.2.1

Left Click on the Downloaded zip file of the Dataset, then click on "Extract All"


2.2.2 

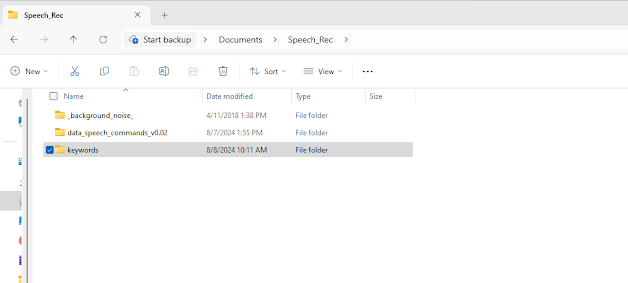
Create a folder for housing the necessary files. In this example I named it "Speech_Rec".


2.2.3 

Cut and paste the _background_noise_ into the created folder. The background_noise_ must be stored seperately from the individual keywords.


2.2.4


Create a folder for housing keywords such as "on" and "off". (The video example includes using custom keywords as well)


2.2.5

Copy and paste the "on and "off" keywords into the newly created "keywords" folder


2.3 Using the Program

2.3.1

Python will need to be installed to run the speech Recognition Code Download Python  
Click on the yellow box to download the latest version.

2.3.2

If you already have Python installed, it may ask to upgrade to the latest version. Otherwise, there should be an option to install.


2.3.3

An option to close the installer will appear once setup is successful


2.3.4

Open Windows Powershell (Terminal)( and type the following command:  
pip install librosa numpy soundfile
This installs all the necessary Python libraries for the speech recognition.


2.3.5

While in the PowerShell, go to the folder that contains all the speech recognition files ("Speech_Rec"). 
To find the path click on the folder name in file explorer, then left click and select "Copy Address"


Use the cd command followed by the path to the directory, for example: cd C:\Users\maxcl\Downloads\Speech_Rec

2.3.6

Next, enter the following line into the terminal. It runs the dataset-curation.py script and sets all the necessary parameters.

python dataset-curation.py -t "on, off" -n 1500 -w 1.0 -g 0.1 -s 1.0 -r 16000 -e PCM_16 -b "..\Speech_Rec\_background_noise_" -o "Speech_Rec\keywords" "..\Speech_Rec\data_speech_commands_v0.02" "..\datasets\keywords"


The script may take a few minutes to run.


2.3.7

Once it's finished, a set of folders named after the input, output, and keywords can be found in the directory. (Note: In this case, the folder name "Speech_Rec" appeared twice so I changed the second one to "results")


2.3.8

Open the "on" folder and select one of the audio samples to play.


2.4 Edge Impulse

2.4.1

Next, we will go to Edge Impulse. Click on the "Login" Option in the top left corner of the home screen, as this will give you the option to either log into your account or create a new account.

2.4.2

Once you've created an account and/or logged in, click on the icon in the top left, then click on "Projects"


2.4.3

Click on "Create New Project"


2.4.4

Name your project then click on the green "Create New Project".  I chose to leave this one as public.


2.4.5

In the new project, Click on "Data Acquisition" 

2.4.6

Next, click on "Add Data"


2.4.7

Select "Upload Data"
 

2.4.8
Leave the default selections for category and label, and click on "Select Files"


2.4.9

Start by uploading all the files in the noise folder. (I selected all by clicking on the box next to "name"). Click "Open"

2.4.10

Afterwards, click on the purple "Upload Data" button
Edge Impulse will then process and add the files to the project.

2.4.11

Repeat steps 2.4.8 through 2.4.10 for the "on" "off" and "unknown" categories.

2.4.12

The pie charts at the top of the Dashboard should show that the data is split amongst the four categories, and 80% of the data was assigned to training and 20% was assigned to testing.


2.4.13

On the left side, Click on Impulse Design, then Create Impulse. Click on " Add Processing Block".


2.4.14

Add the Audio (MFCC) Processing Block

2.4.15

Select the "Add a Learning Block Option", then choose the default "Classification" Block


2.4.16

Click on the Green "Save Impulse"


2.4.17

From the MFCC on the left, Select the Generate Features tab, then click on "Generate Features"


2.4.18

Next, under Classifier on the left, choose Save & Train. 

2.4.19

Now that the model is trained, the loss and accuracy of the model will appear. The accuracy refers to the percentage of the data that was correctly classified. As for loss, it is based upon a predefined function, and a smaller loss value indicates better ML model accuracy.

2.4.20

To test the model, go to Model Testing on the left. Select "Classify All".

2.4.21

Once the testing is done, the results will be shown.


2.4.22

Next, we will deploy the model for Arduino. Click On the Search Bar and select the Arduino Options. (Note: There are other options that can be used for other Microcontrollers such as STM32 devices)


2.4.23

Select "Build" to create the Arduino Library, which will Download automatically.
Once it's done building, a dialogue will pop up showing the path for using the Arduino Library


2.5 Arduino

2.5.1

In the Arduino IDE, open a new Arduino Sketch (File - New Sketch)

2.5.2

Once you're in a new sketch, select Sketch-Include Library- Add .ZIP Library and open the library downloaded from Edge Impulse

2.5.3

Next, Go to File- Examples and scroll down to find the library you just installed. It should have the same name as the project in Edge Impulse. Go to "Speech_Rec_inferencing"(May differ based on your project name) - "nano_ble33_sense" - "nano_ble33_sense_microphone_continuous". Note: the Arduino IDE might need to be restarted for it to appear)


2.5.4

Open the File Explorer, and go to the newly installed Speech_Rec library and locate the Model variables file. The path will likely be: User > Arduino > libraries > Speech_Rec_Inferencing > src >model_parameters > model_variables 


2.5.5

Open the model_variables.h file in a code editor such as VS Code, and search for where the keywords are listed. 
The line will likely be:  
const char* ei_classifier_inferencing_categories[] = { "_noise", "_unknown", "off", "on" };

In this case "_noise" is in position 0, "_unknown" is in 1, "off" is 2, and "on" is 3.


2.5.6

Return to the Arduino IDE. In the nano_ble33_sense_continuous example, create a new line under 
line 59: static int print_results = -(EI_CLASSIFIER_SLICES_PER_MODEL_WINDOW);

The new line will read: static const int led_pin = LED_BUILTIN;

2.5.7

Next, go a few lines down to be within the void setup() { block of code.


Type the following line: pinMode(led_pin, OUTPUT);


2.5.8

Even further down in the code, above line 114: if (++print_results >= (EI_CLASSIFIER_SLICES_PER_MODEL_WINDOW)) {

Enter the following block of code:


    //turn on LED if "On" vlaue is above a threshold
    if (result.classification[3].value > 0.7) {
      digitalWrite(led_pin, HIGH);
    }
    //turn off LED if "Off" vlaue is above a threshold
    else if (result.classification[2].value > 0.7) {
      digitalWrite(led_pin, LOW);
    }
    else {
      digitalWrite(led_pin, LOW);
    }
   
This code controls whether the LED is "on or "off" based on the keyword recognized. the result.classification[2] and result.classification[3] values are consistent with the labels for "Off" and "On" found in the model_variables.h file.


2.5.9

Next, click the arrow to upload the code. It may take awhile to compile, as it is a lengthy code segment

2.5.10

Once the code is complied, speak the keywords within a couple inches of the board. The voice needs to be very close for the recognition to work. If the board recognizes a word with a confidence value of 0.7, the LED next to the USB will turn yellow.


2.5.11

To check the readings for the speech recognition values on the board, you can look at the serial monitor in the Arduino IDE. To do this click on Tools > Serial Monitor (or type Ctrl + Shift + M). The serial Monitor continually shows the speech rec values for all the keywords, as we are in the continuous example.


We now have a working Arduino program that uses machine learning to recognize the words "on" and "off". In the future, the code can be adjusted so that the LED stays on for longer, thus making the "off" command more effective.


Wednesday, August 21, 2024

Introduction to Machine Learning on Arduino - Micro Speech - Part 1

The beginning of this guide is based off of the post Get Started With Machine Learning on Arduino | Arduino Documentation. Up through the speech recognition example, it follows mostly the same steps. I've added steps for clarity and detail, for anyone starting from scratch.  Additionally, I encountered an issue with the Windows Machine I'm using crashing due to the GameInput Application, which will be addressed at the end.

The examples in this guide are part of the field of TinyML. TinyML is machine learning done on low-power devices such as the Arduino Nano we are using. 

I have written this guide so that the program can be run and tested in the Arduino IDE as of June 2024.

This is Part 1 of 2 in this series of posts. In part 2, I will show how to change the keywords using Edge Impulse.

1 Creating a New Arduino Sketch

Monday, August 19, 2024

ST Micro eStore Free Global Delivery for August

The STMicroelectronics eStore is offering free worldwide delivery for the remainder of August.  No code or minimum purchase is required.  There are also a few buy-one-get-one-free offers with a code.

Wednesday, July 17, 2024

Ezurio Development Board Kit Giveaway

Ezurio (formerly Laird Connectivity) is offering a development kit giveaway that includes a System on Module (SOM), a carrier board, a wireless module, and an antenna. Ezurio specializes in SOMs featuring NXP i.MX processors, including the i.MX 8M Mini, 8M Plus, and i.MX 93, with support for both Android and Linux. The giveaway also includes Sona WiFi 6/6E and Bluetooth LE modules.


Monday, July 15, 2024

Machine Learning Development Boards

My name is Maxwell Clarke, I am an embedded systems engineer at Aaron Clarke where I am researching machine learning application development.  An easy way to get started with machine learning development is to use an off-the-shelf development board. Here are some development boards I've identified that support machine learning. I will be posting tutorials for some of these boards in the upcoming weeks.

Arduino Tiny Machine Learning Kit 

This kit's main purpose is to run TinyML projects by using TensorFLowLite on the board included.  It contains an Arduino Nano 33 BLE Sense board, which features the 32-bit Arm Cortex-M4 microcontroller in an nRF52840 processor from Nordic Semiconductors. The board also has sensors for proximity, motion, and many other measurements.  The kit costs $60 from the Arduino Store.


BeagleBone® AI-64 

The BeagleBone AI-64 has great computing power as it contains a Texas Instruments TDA4VM SoC with a dual 64-Bit Arm Cortex-A72 microprocessor. It interfaces via a M.2E-key PCIe USB 3.0 connector for WiFi, Ethernet, and USB 3.0. Also included are 4-Lane CSI and DSI connectors for cameras and displays, respectively. It is available for about $190 from online distributors such as Digi-Key


BeagleY-AI 

This board uses a TI AM67A Arm- based vision processor, which contains a 64-bit Arm Cortex-A53 Microcontroller. It also has a BM3301 BLE module for networking over BLE.  Other features include 3 displays including touchscreen support, a 10-pin Tag-Connect and 4 USB3 ports.  It is less expensive than the AI-64 as it has a cost of around $70.

This kit contains the Jetson Orin Nano 8GB, which features an Ampere GPU and a 6-core ARM CPU. It has a processing ability of up to 40 TOPS, making it the most powerful board on this list.  Due to its top performance capabilities, it cost $500 from online distributors such as SparkFun.


In December 2024, NVIDIA unveiled a new and improved version of this Jetson Kit, the Jetson Orin Nano Super Developer Kit with an improved processing power of up to 67 TOPS. This board retailed for $250 and quickly sold out. Owners of the previous Jetson Orin Nano Developer Kit can also access the super capabilities of the new kit by upgrading the SDK, more instructions can be found on this page: Jetpack SDK For more information on Super developer kit, check out my post reviewing its key features, NVIDIA's Jetson Orin Nano Super Developer Kit The following video is from NVIDIA CEO Jensen Huang, showcasing the kit's small size and high performance capabilities.


Renesas currently has a Reality AI Software which is useful for all sorts of ML applications. They also have a wide range of microcontrollers which are compatible with their software.  For example, there are RH850 Automotive MCUs for automotive applications, and RL78 Low Power 8 & 16-bit MCUs |which are good for getting started. Many of the microcontrollers such as the R7F7015813AFP-C#AA3 , which has a cost of $17, can be purchased from online distributors. 


Currently, St Microelectronics has a vast library of Edge AI tools including MEMS Studio.  These software libraries can be used for developing ML applications with STM32 boards.  For example, the X-NUCLEO-IKS4A1 is a sensor kit forSTM32 boards that can be used with MEMS Studio. Both the kit and development boards can be purchased directly from STMicro.  The X-NUCLEO-IKS4A1 costs about $33, and a new compatible board, the NUCLEO-G491RE costs about $16.


Edge Impulse is a suite of tools for conducting machine learning on edge devices.  It has different ways to get started for beginners, ML practitioners, and embedded engineers. The getting started for beginners is a good way to begin with machine learning, without much coding required.


Friday, November 26, 2021

Black Friday 2021 Electronics Deals

I haven't found as many Black Friday promotions this year for electronics - probably due to the ongoing supply chain issues.  If you see a good deal that is not in the list, please leave a comment.

Adafruit has a code for 15% off all weekend here.  It's also Feather Friday which means 20% off all Feather (mainboards) and wing (daughterboards) with the code shown in the site header today.

Parts Express (audio components) has 10% of sitewide.

Pololu Robotics & Electronics Black Friday and Cyber Monday deals on select products are here.

RobotShop has a sale on some items until November 30 here.

Jameco Electronics has free shipping with a code on all orders.